Documentation

Welcome to
Xilyor POS

A complete point-of-sale system built for restaurants, cafés, and retail businesses. This guide covers every feature from daily operations to advanced configuration.

Point of Sale

Process orders and payments with speed. Supports cash, card, and deferred billing.

Product Catalog

Manage items, categories, add-ons, and product images from one place.

Inventory

Track stock, log restocks, view movements, and get low-stock alerts.

Reports & Analytics

Revenue trends, top products, payment distribution, and expense breakdowns.

Clients

Build customer profiles, assign to orders, and manage credit limits.

Printers & Channels

Network and USB thermal printers with routing channels per payment type.

System Requirements

Xilyor POS runs in any modern browser — no installation needed.

Component Requirement
BrowserChrome 90+, Firefox 88+, Safari 14+, Edge 90+
NetworkLocal network or internet connection
PrinterESC/POS compatible (network or USB) — optional
ScannerAny USB/Bluetooth HID barcode scanner — optional

Multi-Language Support

The interface supports three languages, configurable per venue from the Settings → Venue tab.

🇬🇧

English

🇫🇷

Français

🇹🇳

العربية

Core — 01

Point of Sale

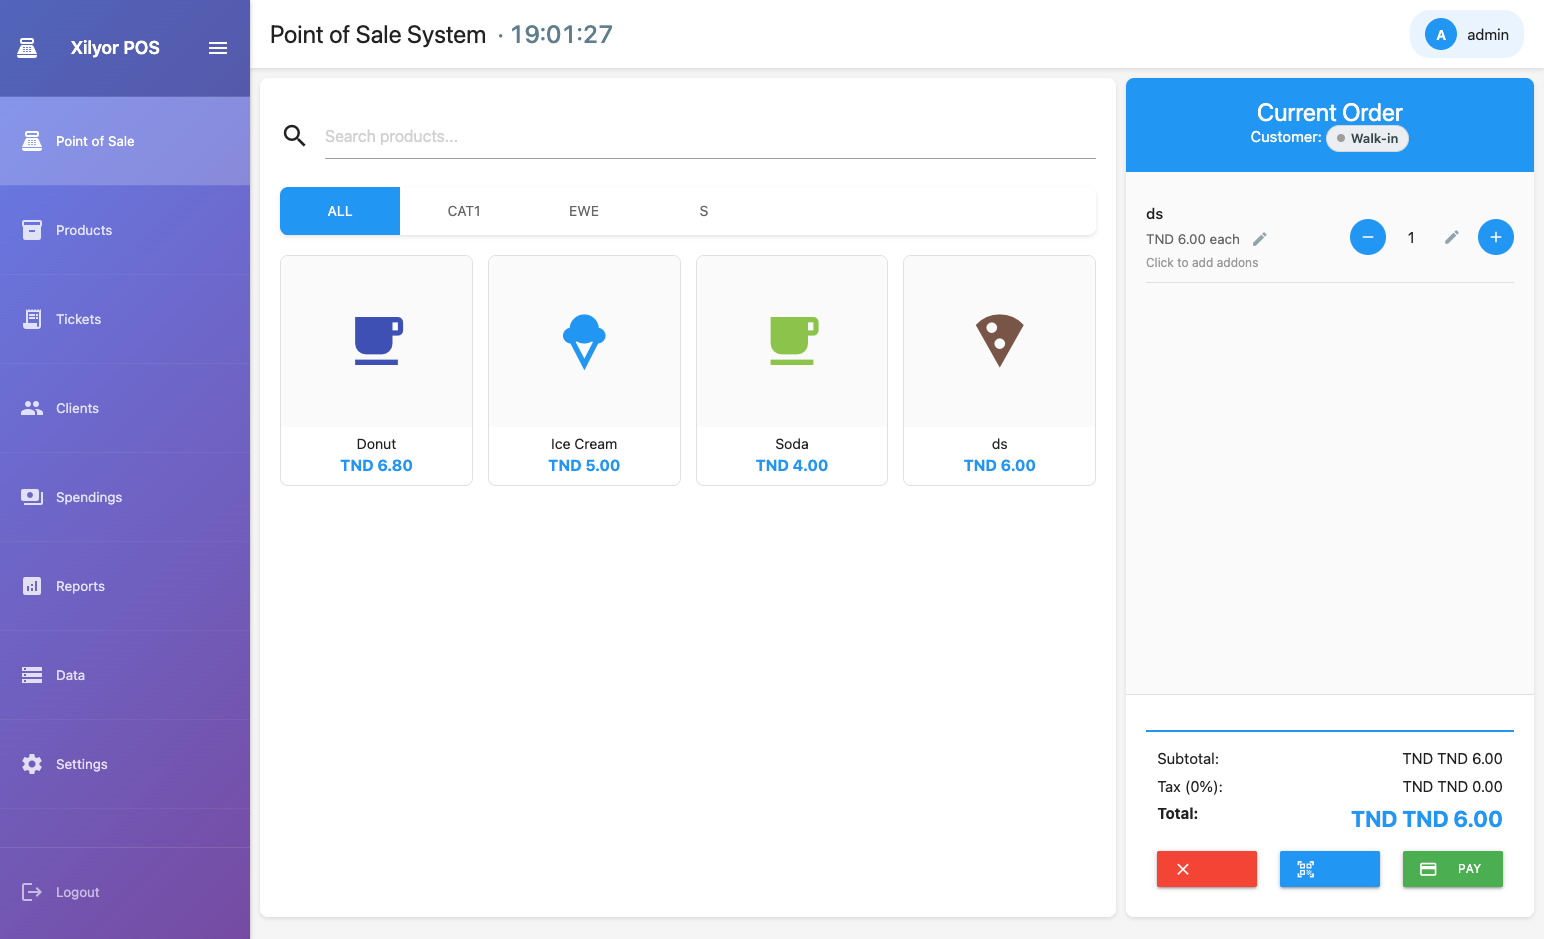
The primary order-taking interface. Add items, assign clients, pick payment methods, and complete transactions in seconds.

Main POS screen
Main POS interface — product grid and cart

How a sale works

  • 1
    Select productsBrowse by category or use the search bar. Click a product to add it to the cart.
  • 2
    Adjust the cartTap +/- to change quantities, long-press an item to add a note (e.g. "no onions"), or click the ✕ to remove.
  • 3
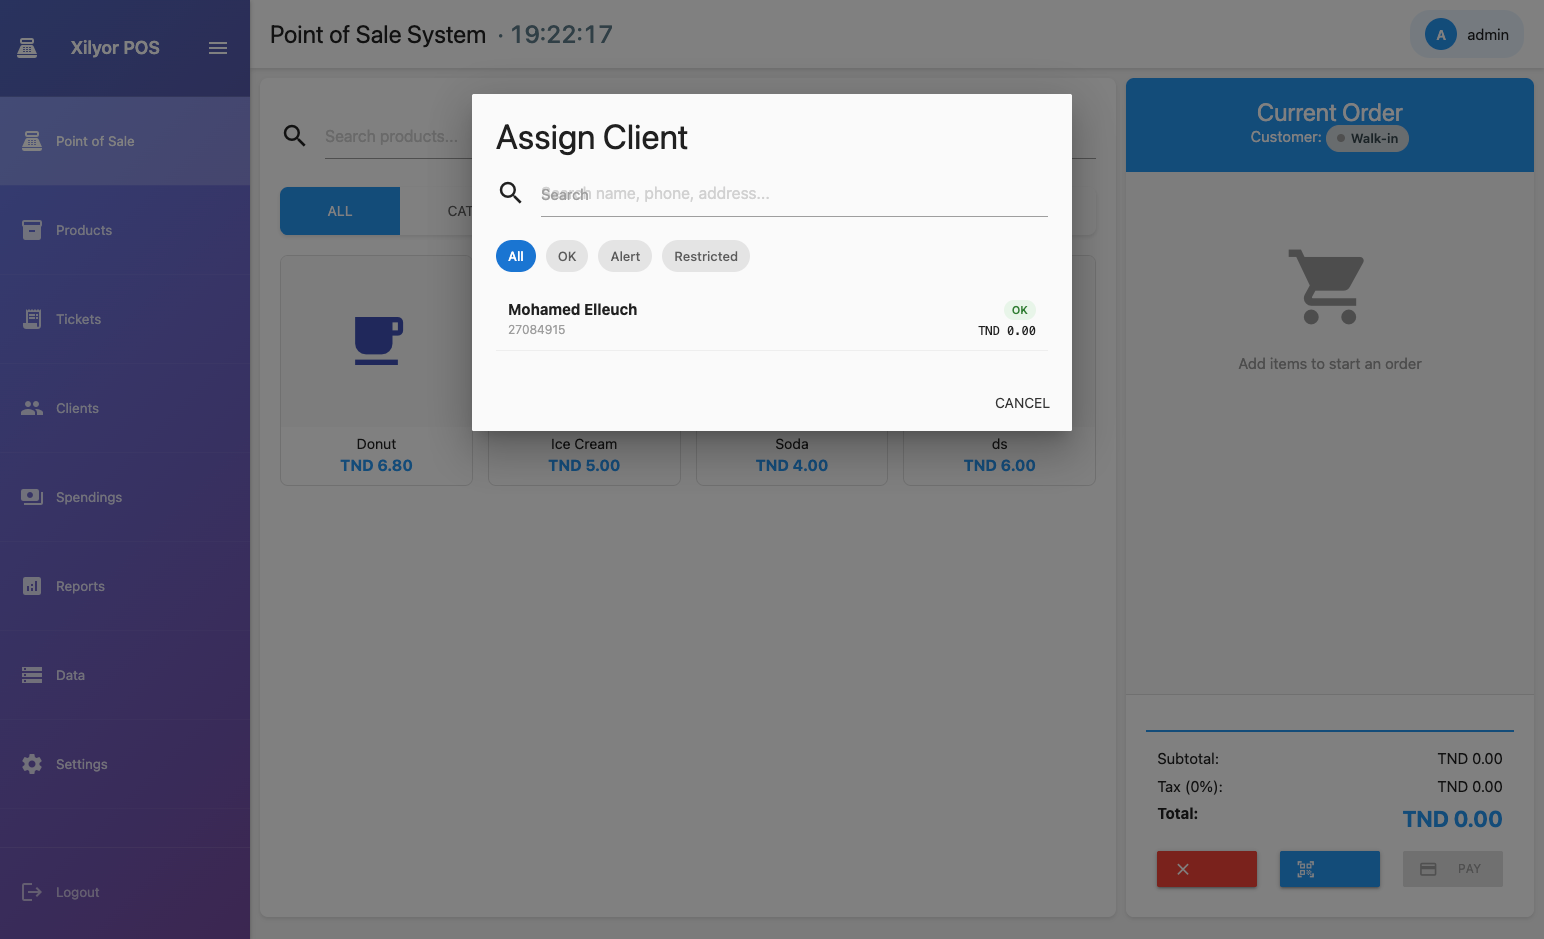
    Assign a client (optional)Click the client badge at the top of the cart to search and pick a client — required for Pay Later.
  • 4
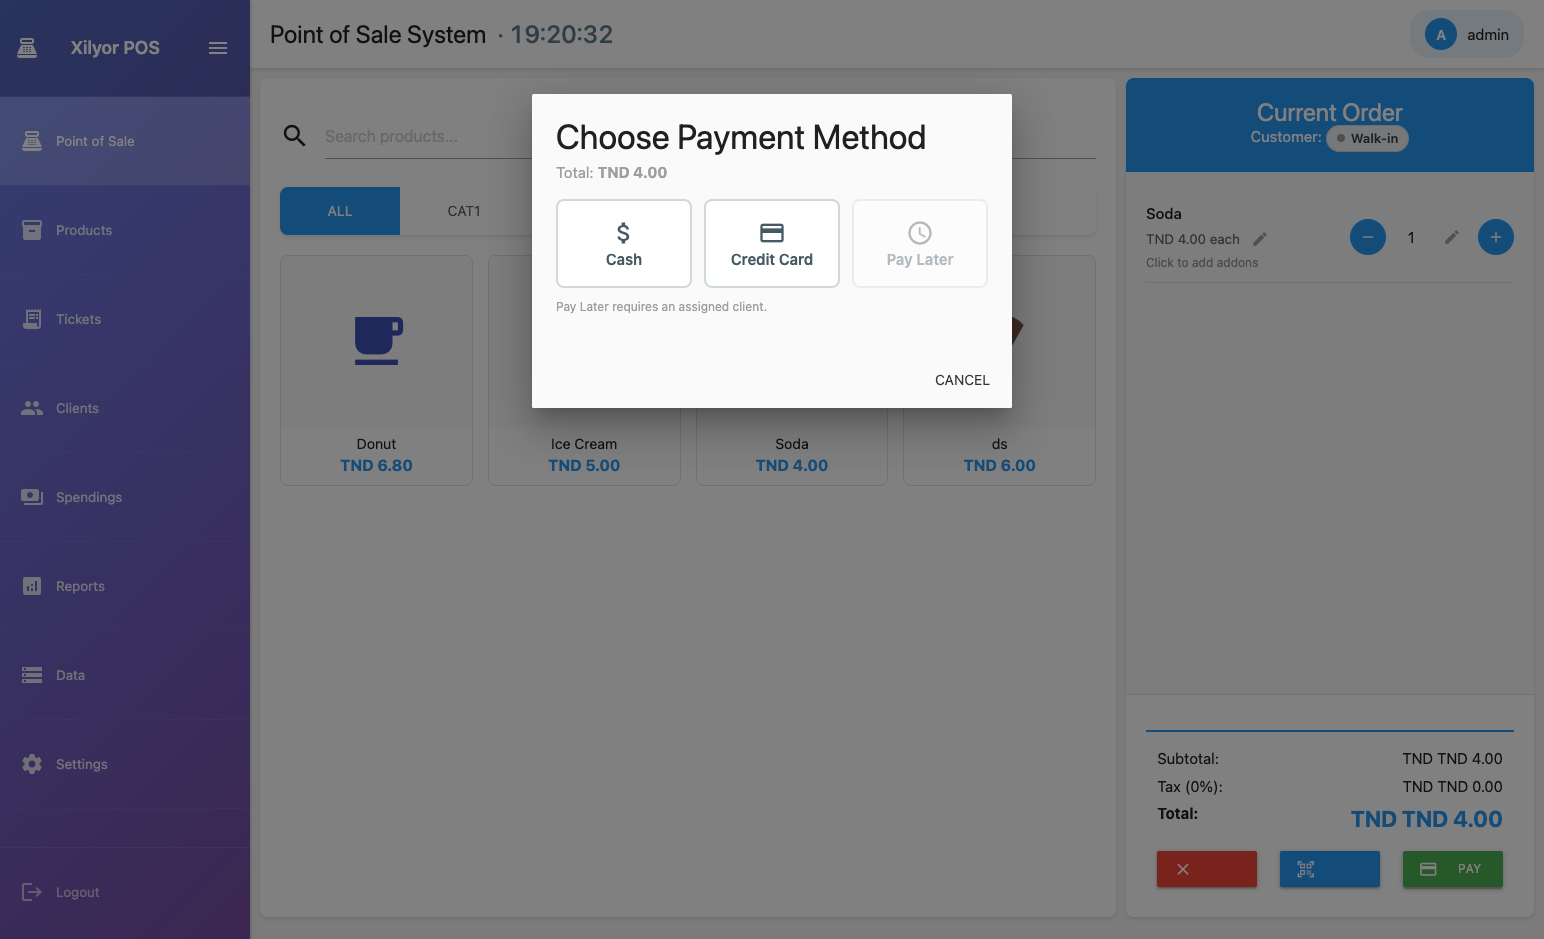
    CheckoutHit the green Checkout button. A payment method dialog appears.
  • 5
    Confirm paymentChoose Cash, Card, or Pay Later. The order is logged and printing fires automatically via configured channels.
Payment method selection
Payment method selector
Assigning a client
Client assignment panel

Additional POS features

Barcode Scanner

Plug in any USB HID scanner. Scan a barcode to instantly add the matching product to the cart.

Table Mode

Enable from Settings → Display. Each table gets its own cart so parallel orders never mix.

Load Previous Order

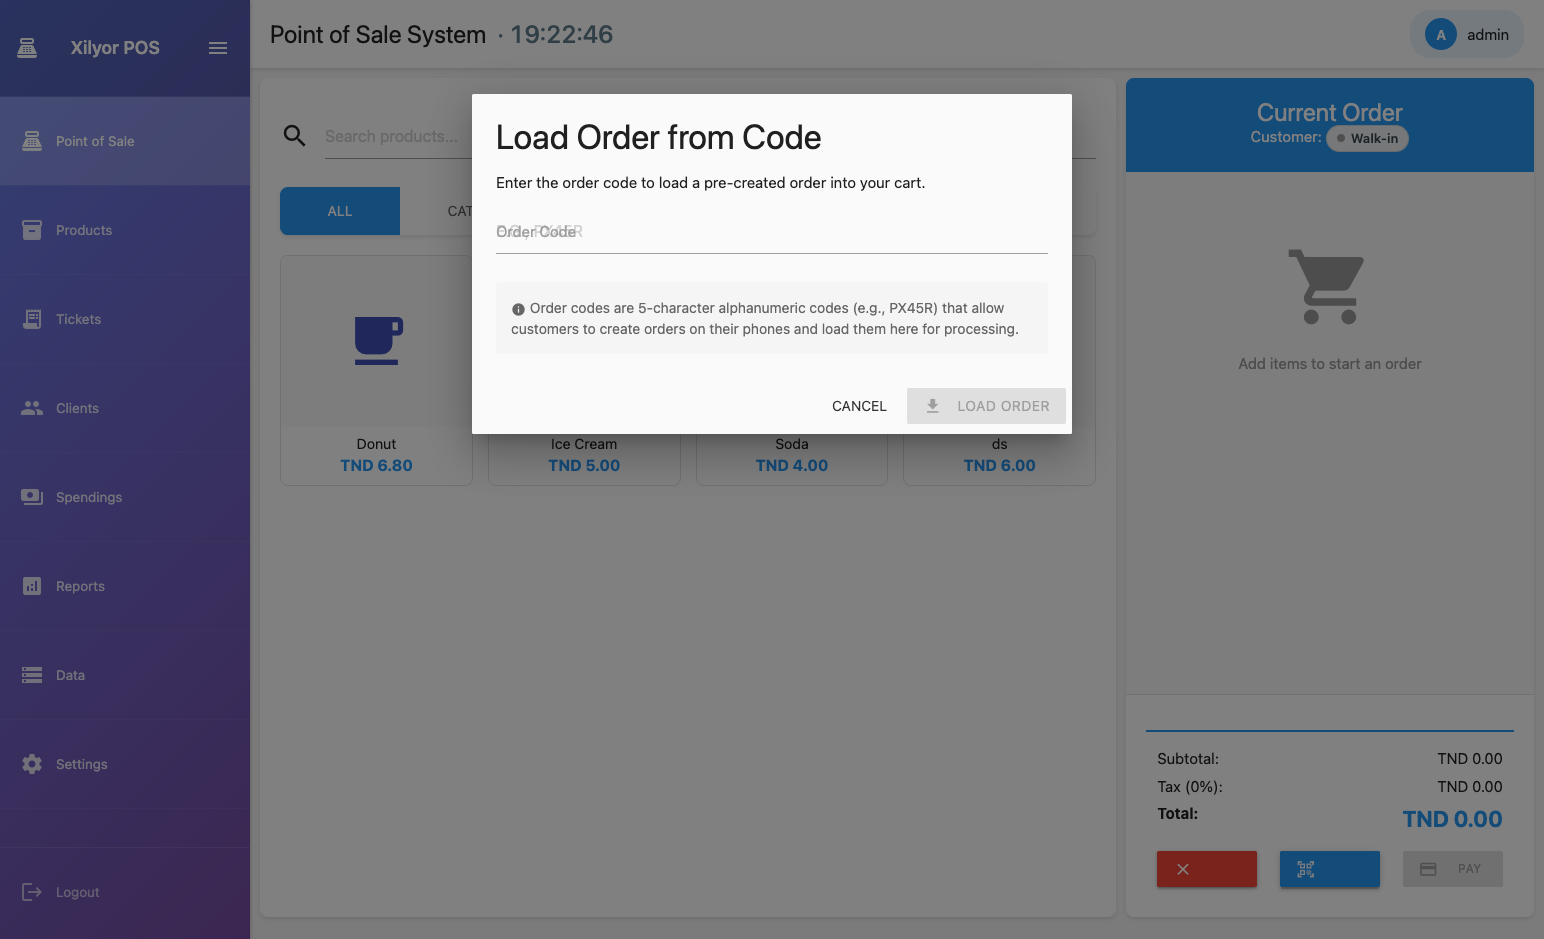
Use the "Load Order" button and enter the order code to pull up and re-print a past order.

Load order from code
Load order by code
Core — 02

Products & Categories

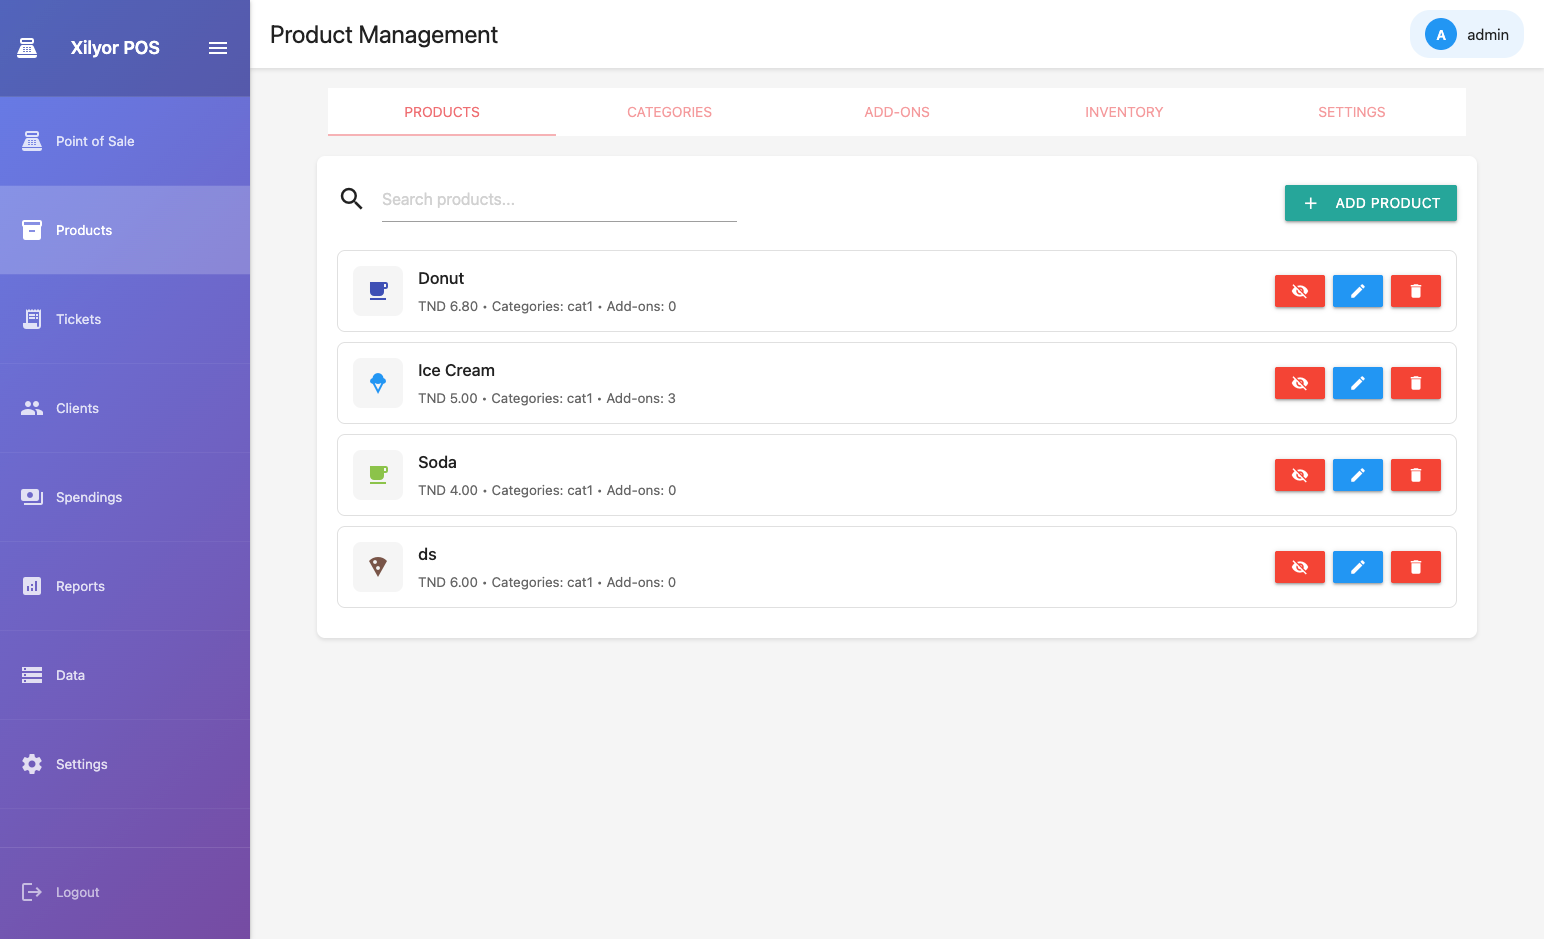
Build your full product catalog. Organize items into categories, attach add-ons, and set custom icons and colors for a clean POS grid.

Products list
Products management — list view

Adding a product

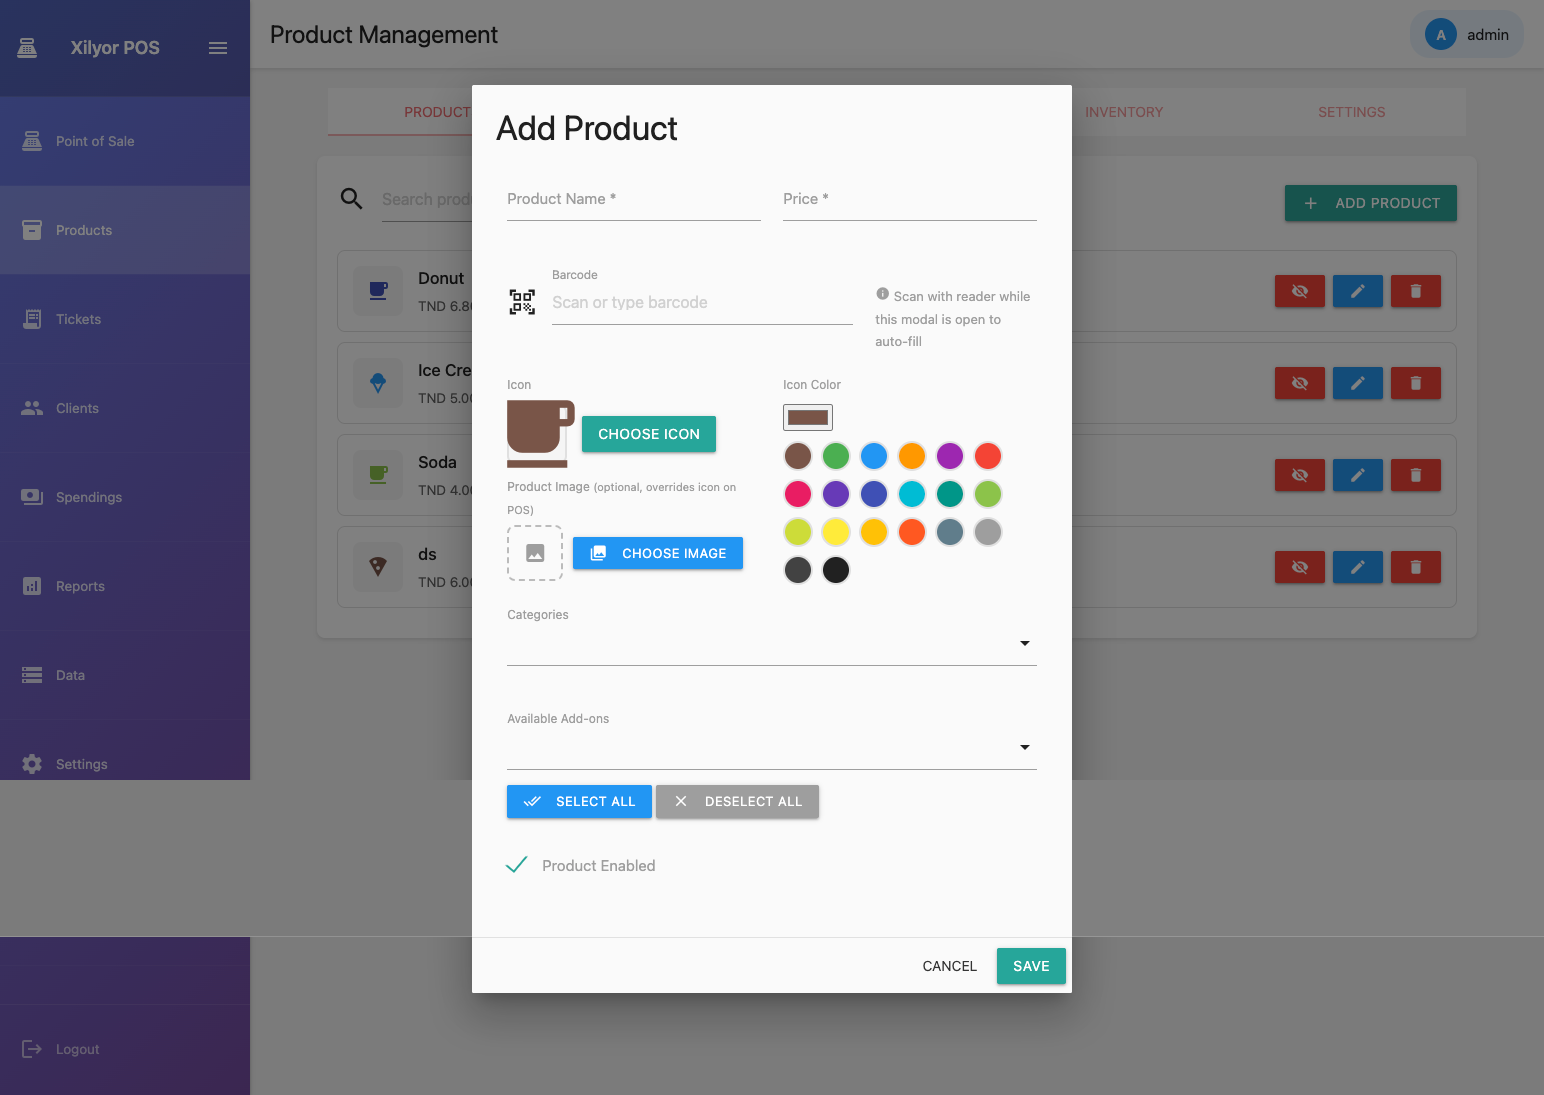
  • Name — required, shown on POS grid and receipts
  • Price — base selling price
  • Category — filters the POS product grid
  • Icon & Color — visual identity on the grid tile
  • Barcode — optional, for scanner lookup
  • Image — product photo, managed via Gallery
  • Add-ons — link modifiers (toppings, extras)
  • Enable/Disable — hide an item without deleting it
Add product modal
Add/Edit product form

Categories

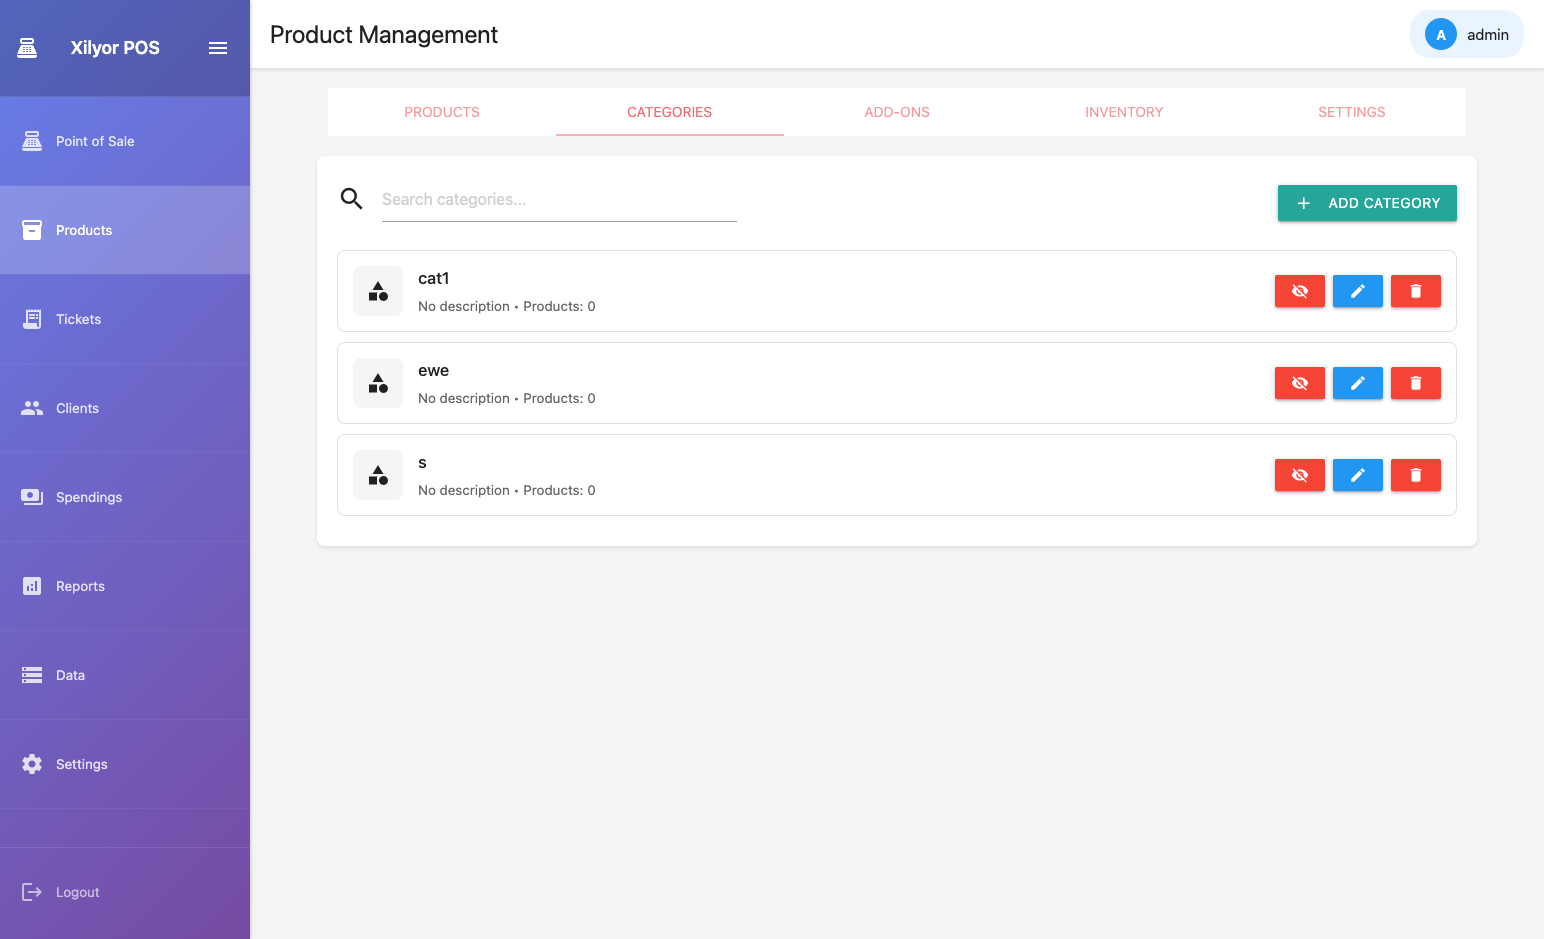
Categories appear as tab filters on the POS screen so cashiers can browse without searching.

Categories list
Categories tab
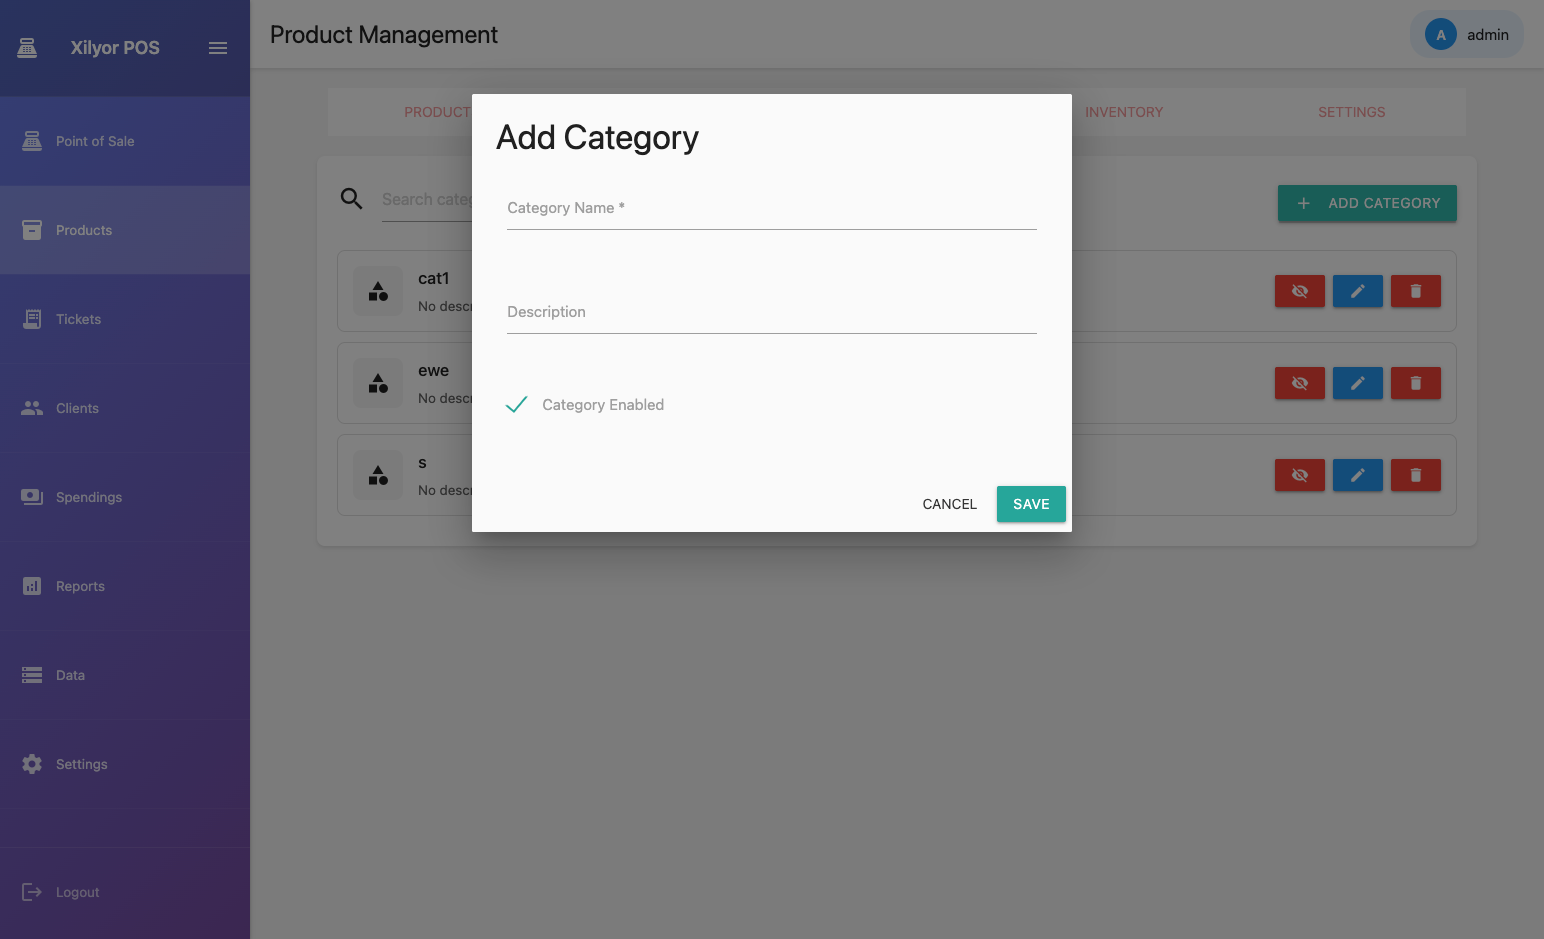
Add category
Add category form

Add-ons (Modifiers)

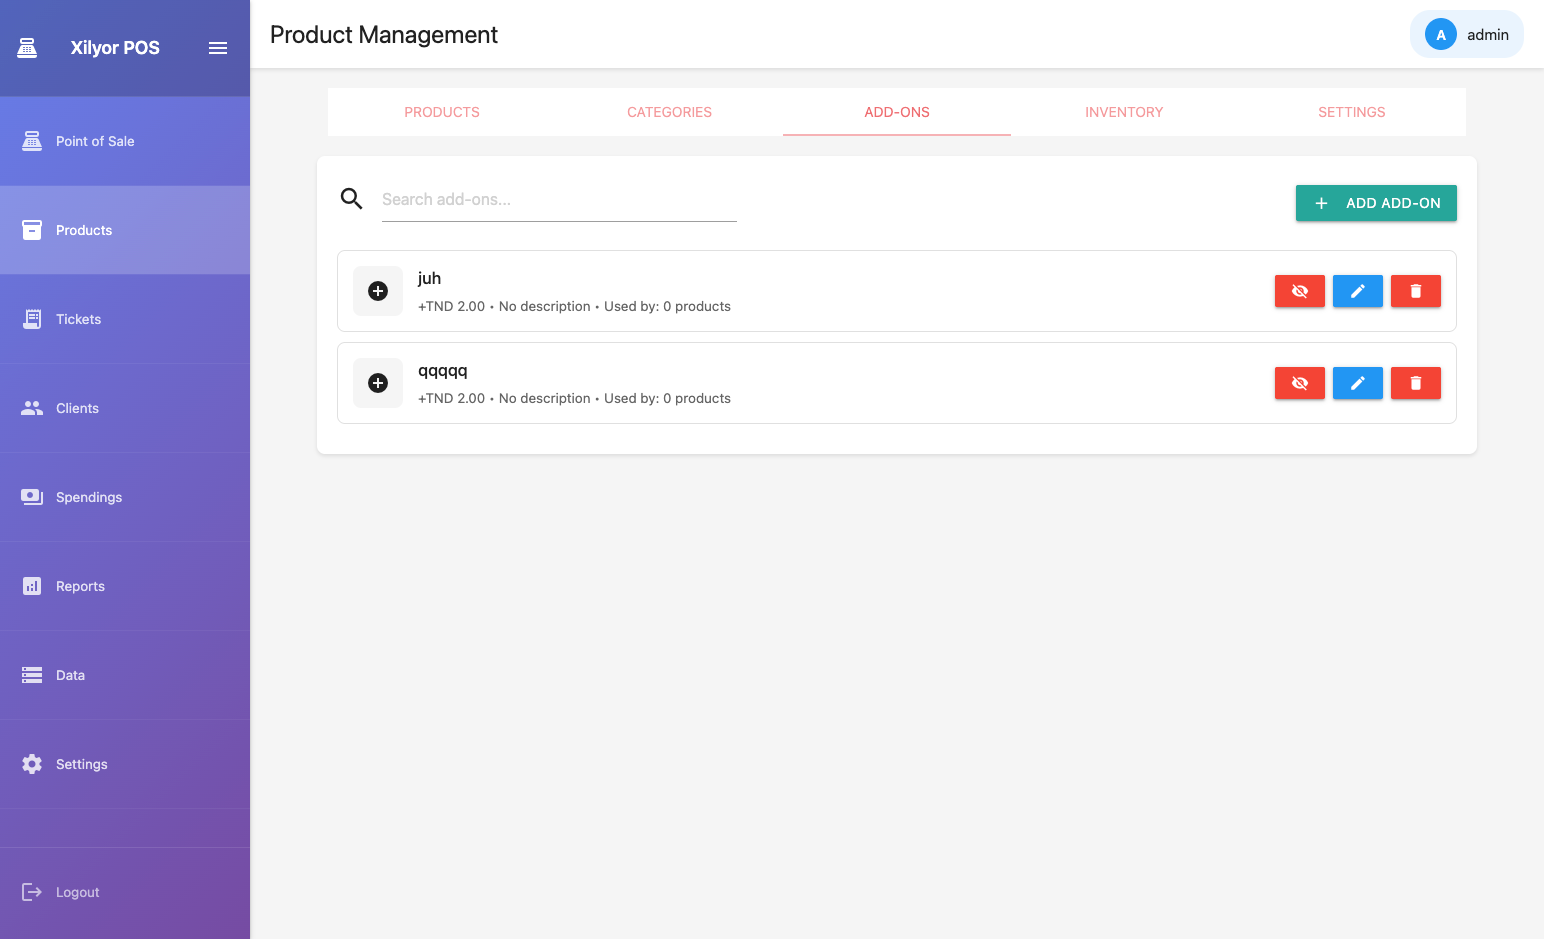
Attach optional extras to products. The cashier picks them at order time.

Add-ons list
Add-ons list
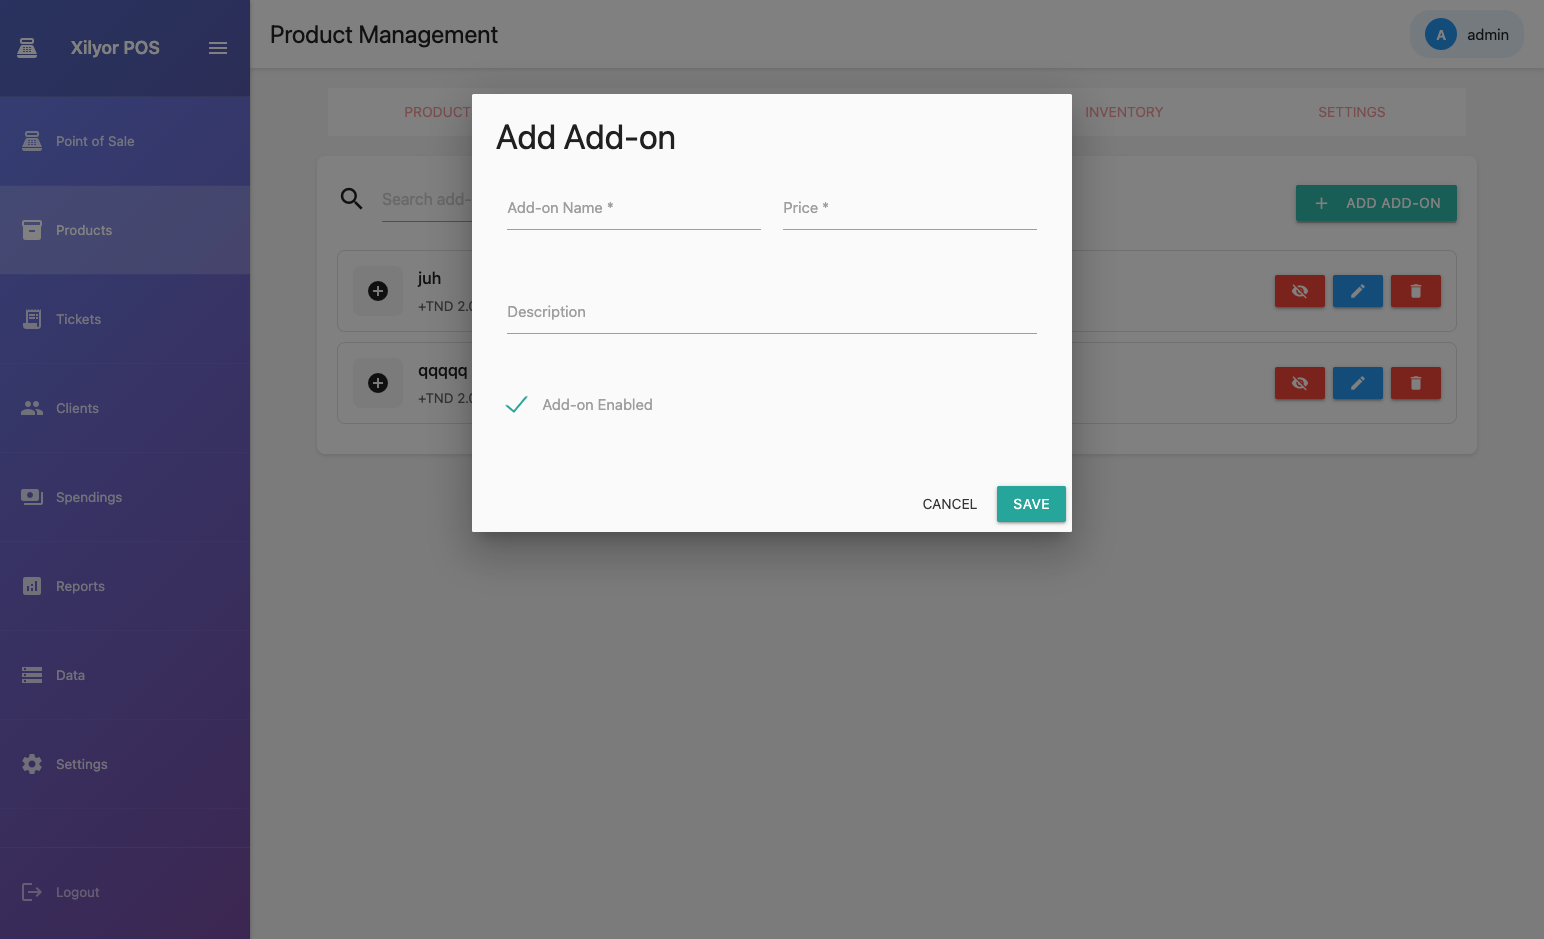
Add add-on form
New add-on form

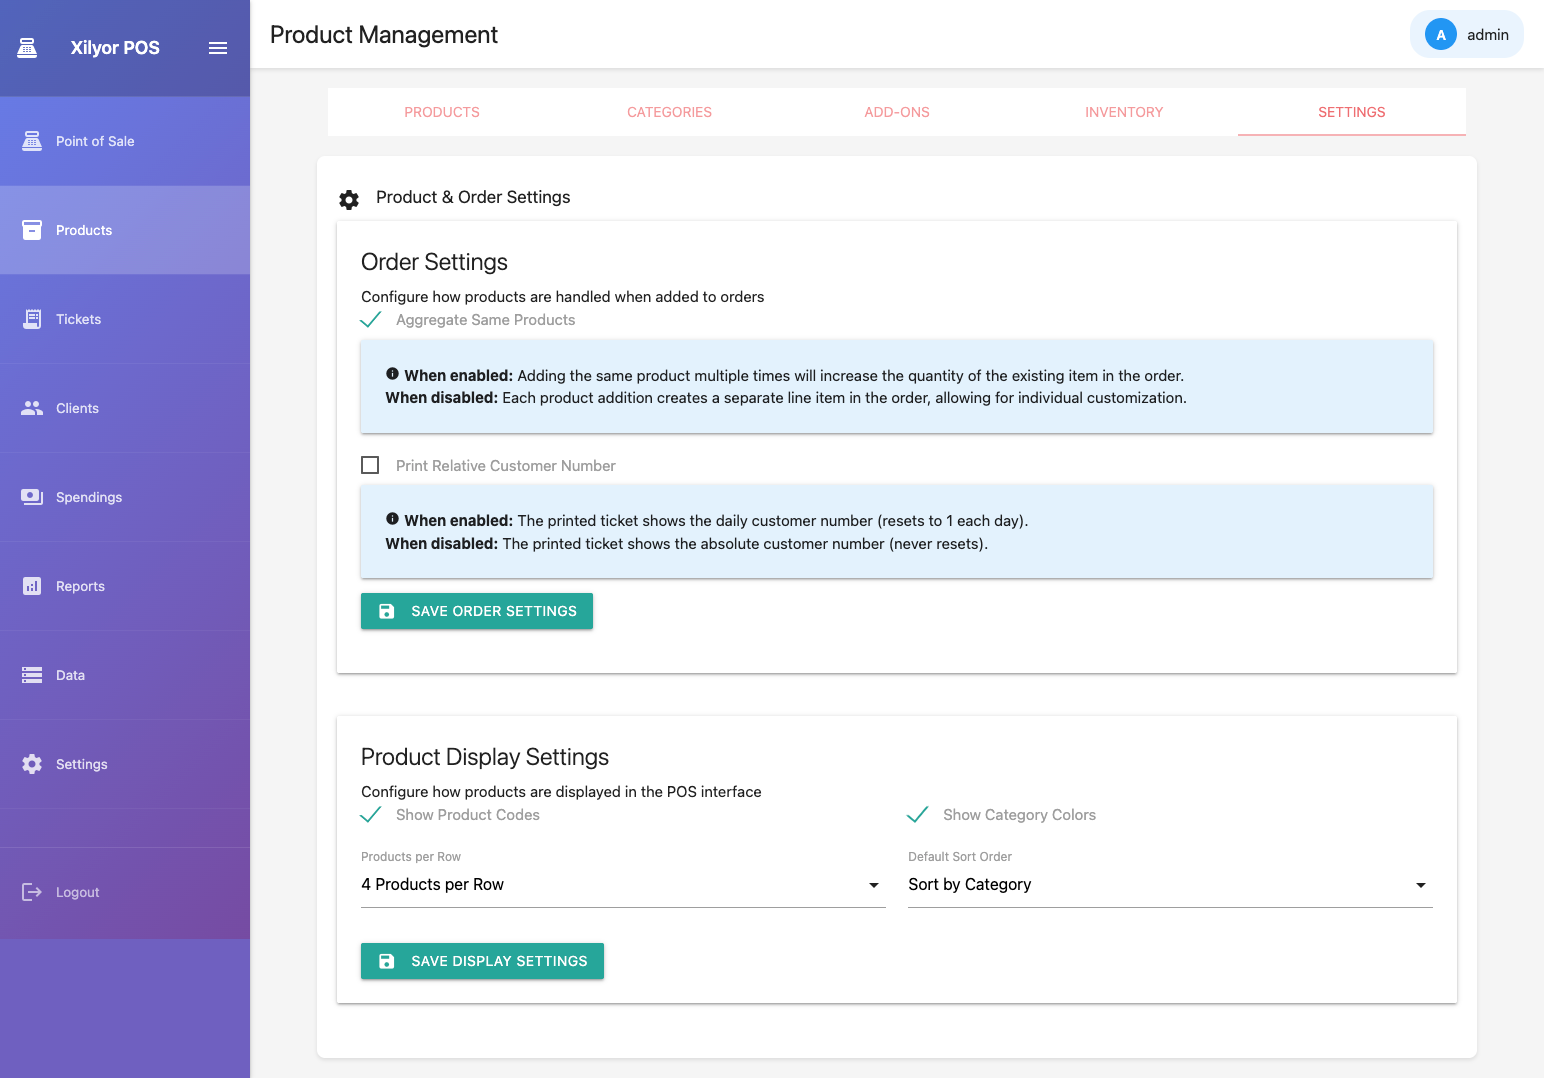
Product display settings

Configure how the POS grid renders products — grid vs list, icon size, and price visibility.

Product display settings
Core — 03

Inventory

Track every unit. Log restocks, adjust discrepancies, and see the full movement history for any product.

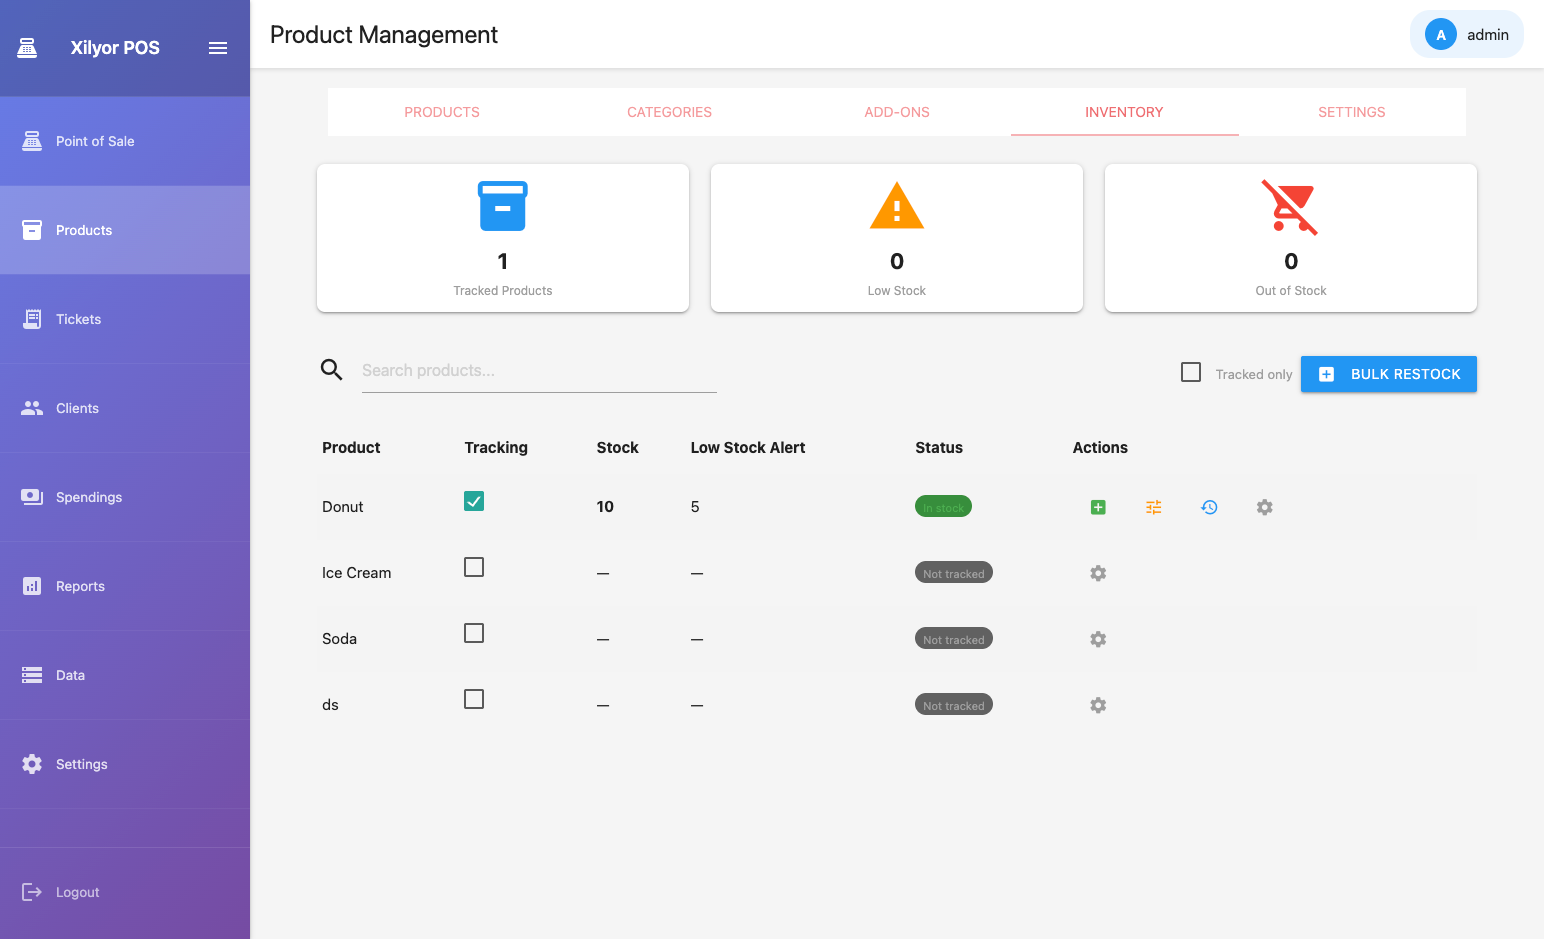
Inventory dashboard
Inventory dashboard — stock levels at a glance

Operations

ActionWhen to useEffect
Adjust Stock Manual correction after a count or breakage Sets stock to exact entered value
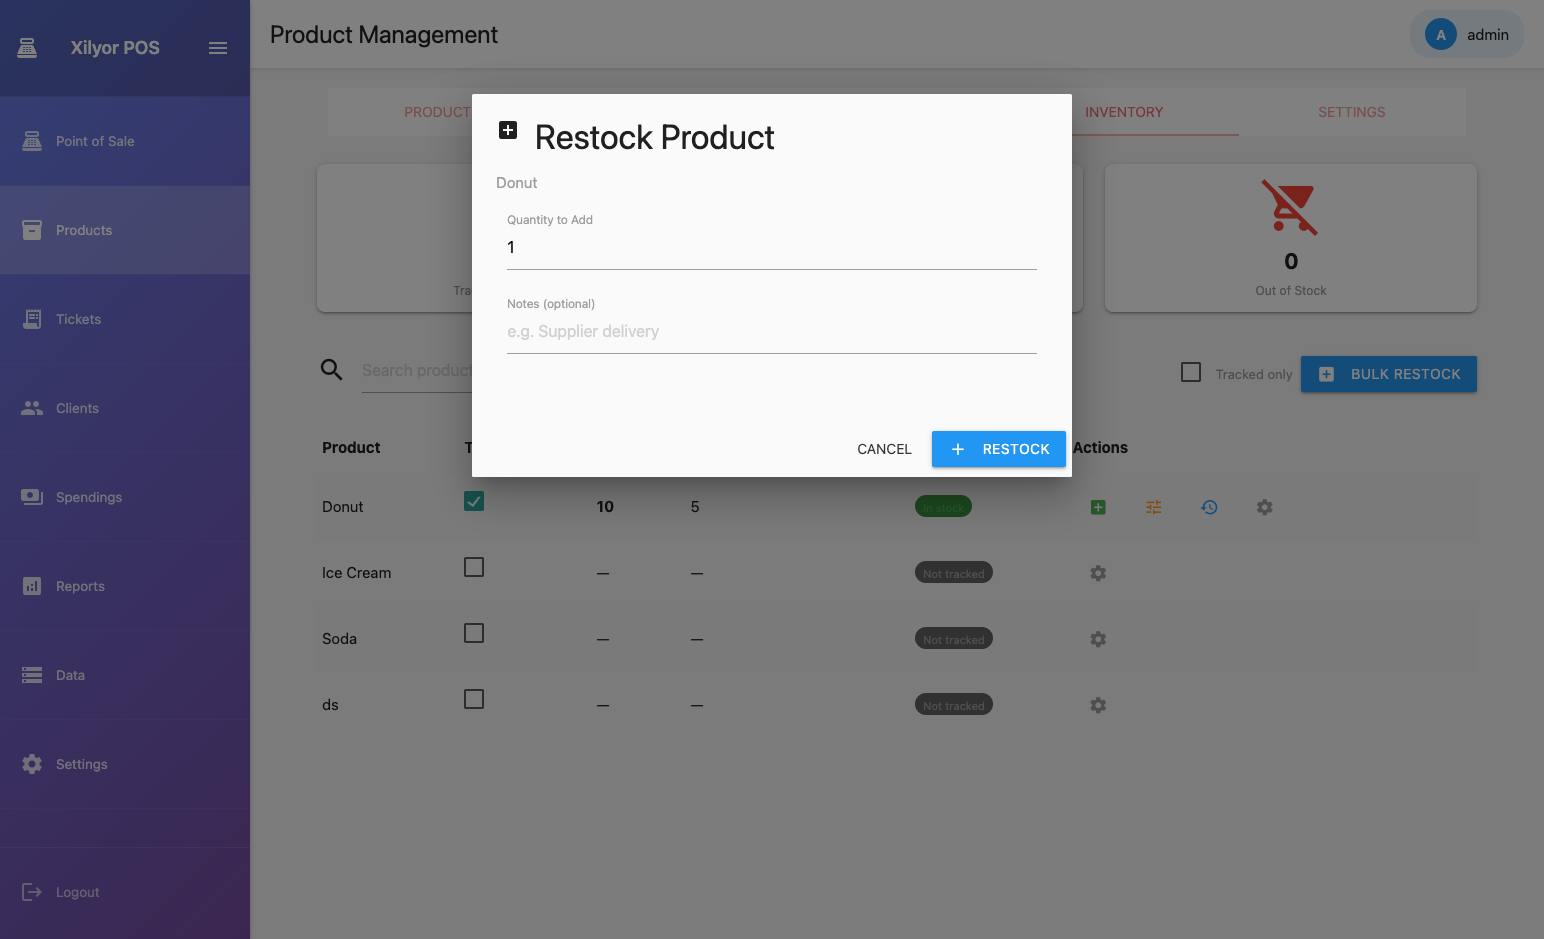
Restock Product Received a delivery for one item Adds the entered quantity to current stock
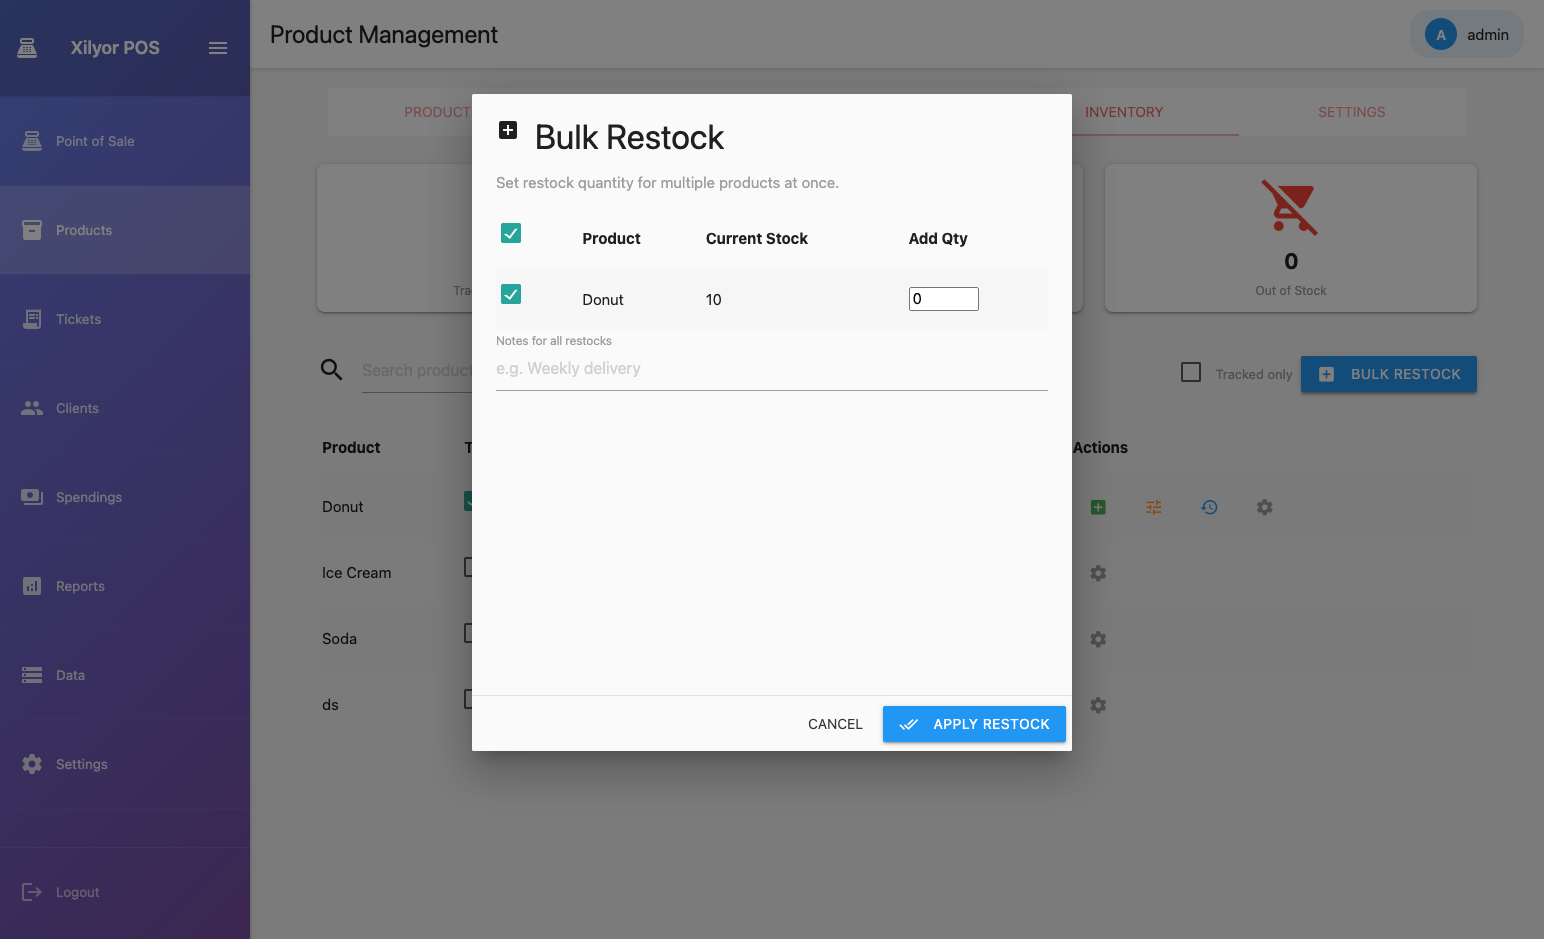
Bulk Restock Received a full delivery for many items Adds quantities for multiple products at once
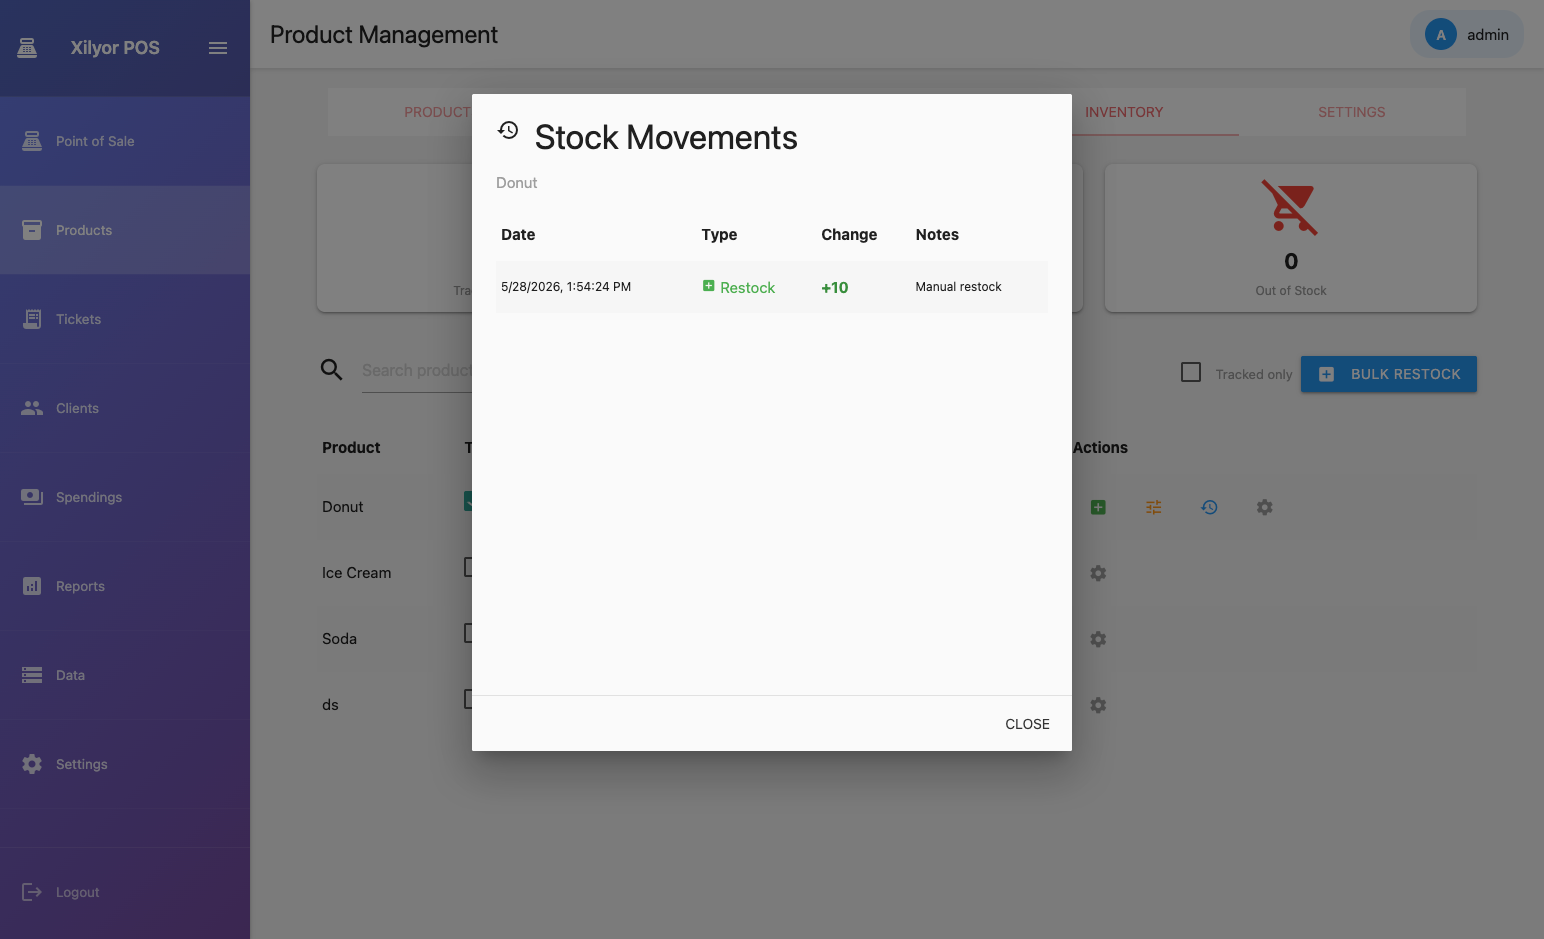
Stock Movements Audit or dispute Read-only history — source, qty, timestamp
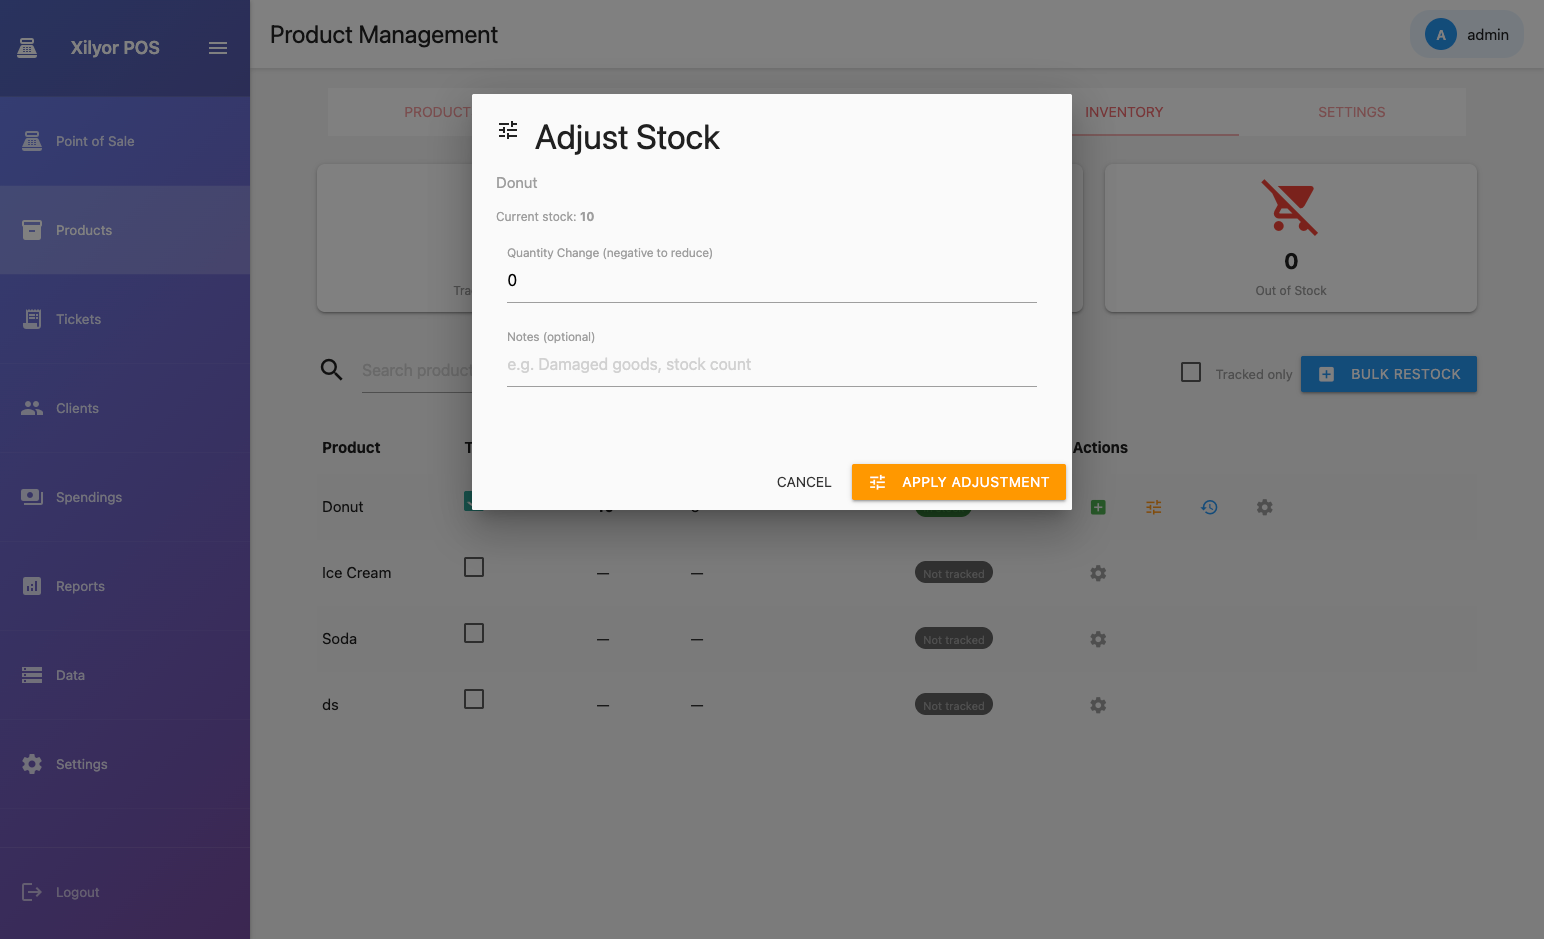
Adjust stock
Manual stock adjustment
Restock product
Single product restock
Bulk restock
Bulk restock — multiple items
Stock movements history
Stock movement history

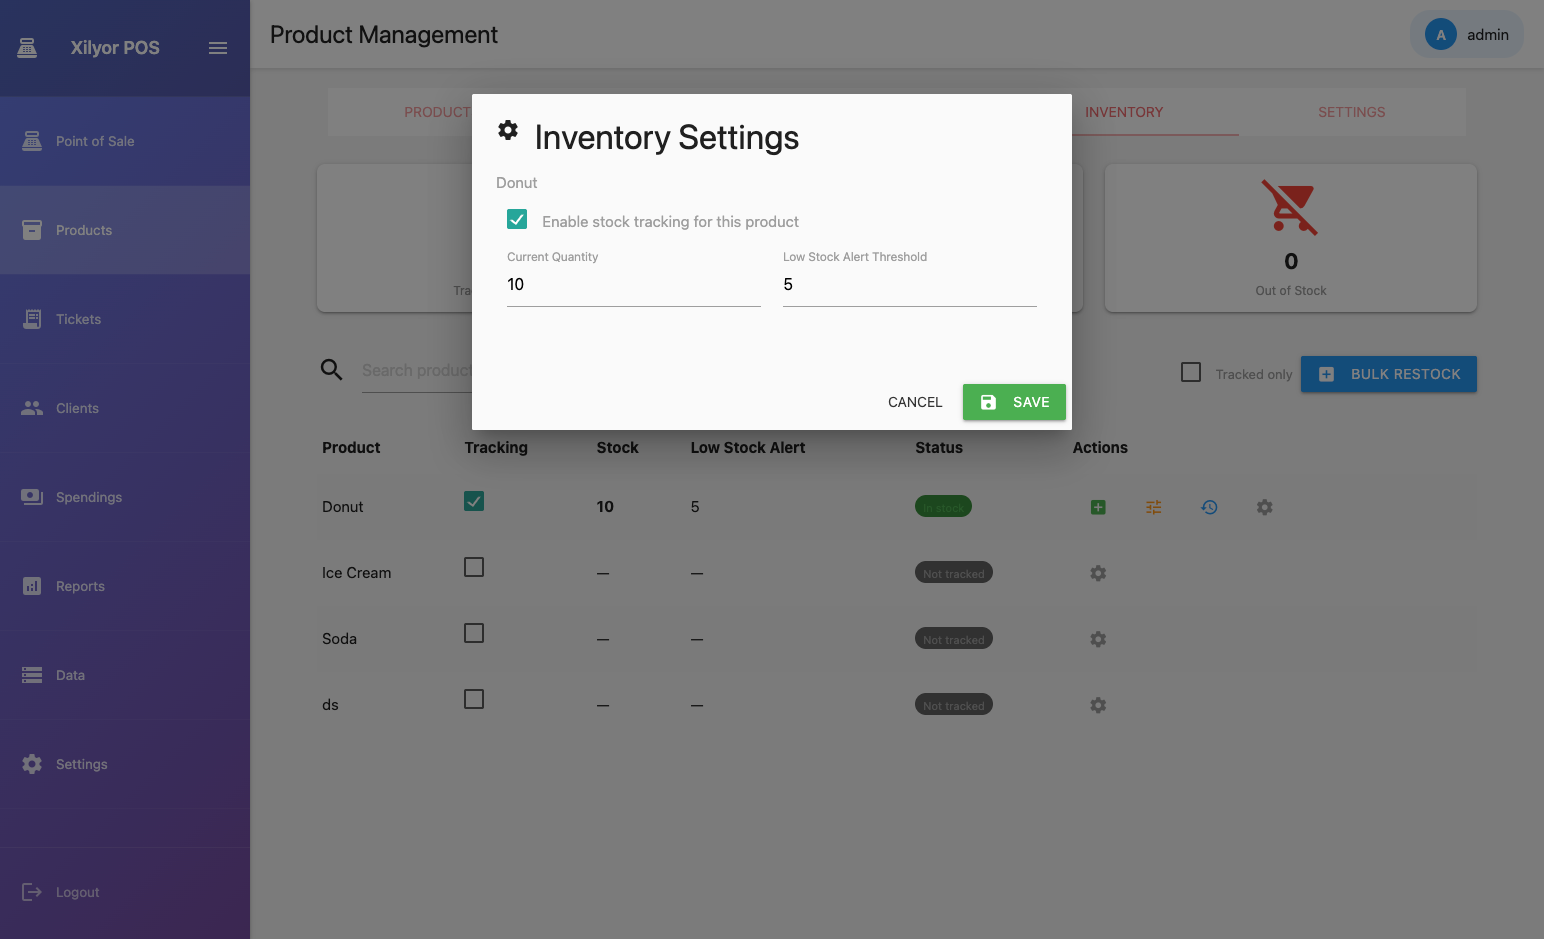
Inventory settings

Configure low-stock thresholds, which products are tracked, and how deductions are handled.

Inventory settings
Inventory configuration
💡
Stock is automatically deducted when an order is paid. If inventory tracking is disabled for a product, sales still go through without deducting.
Core — 04

Tickets & Orders

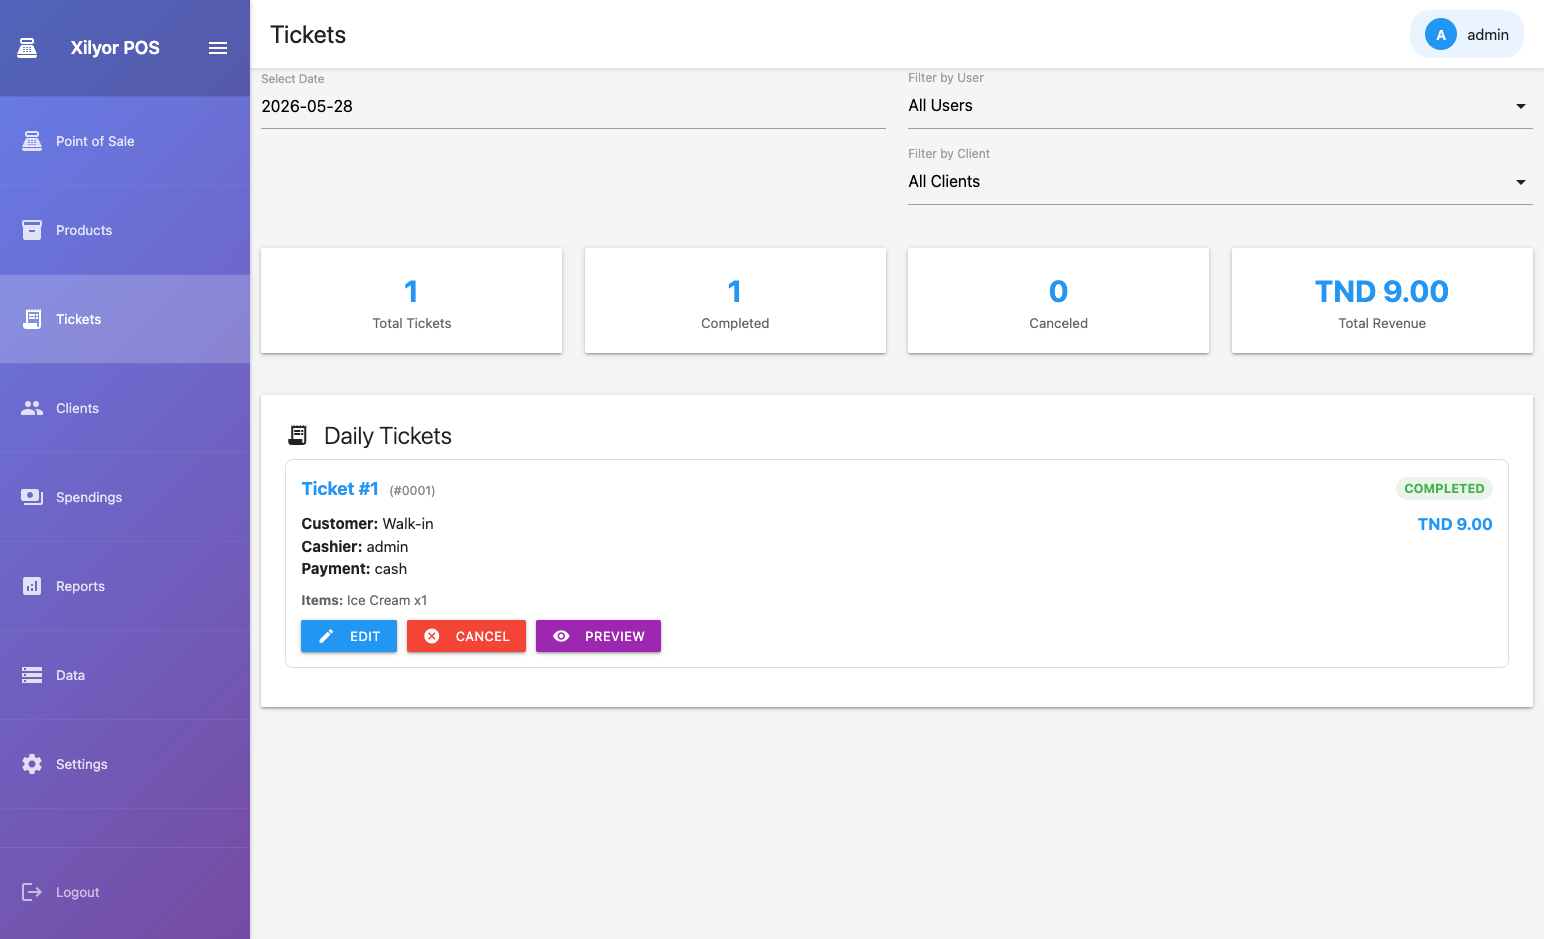
View, manage, and reprint all orders. Every transaction is stored with full item breakdown, payment method, and staff info.

Tickets list
Orders list — searchable and filterable

What you can do

Search & Filter

Find orders by ticket number, date, client name, or payment method.

Reprint Receipt

Reprint any past receipt directly to the configured receipt printer.

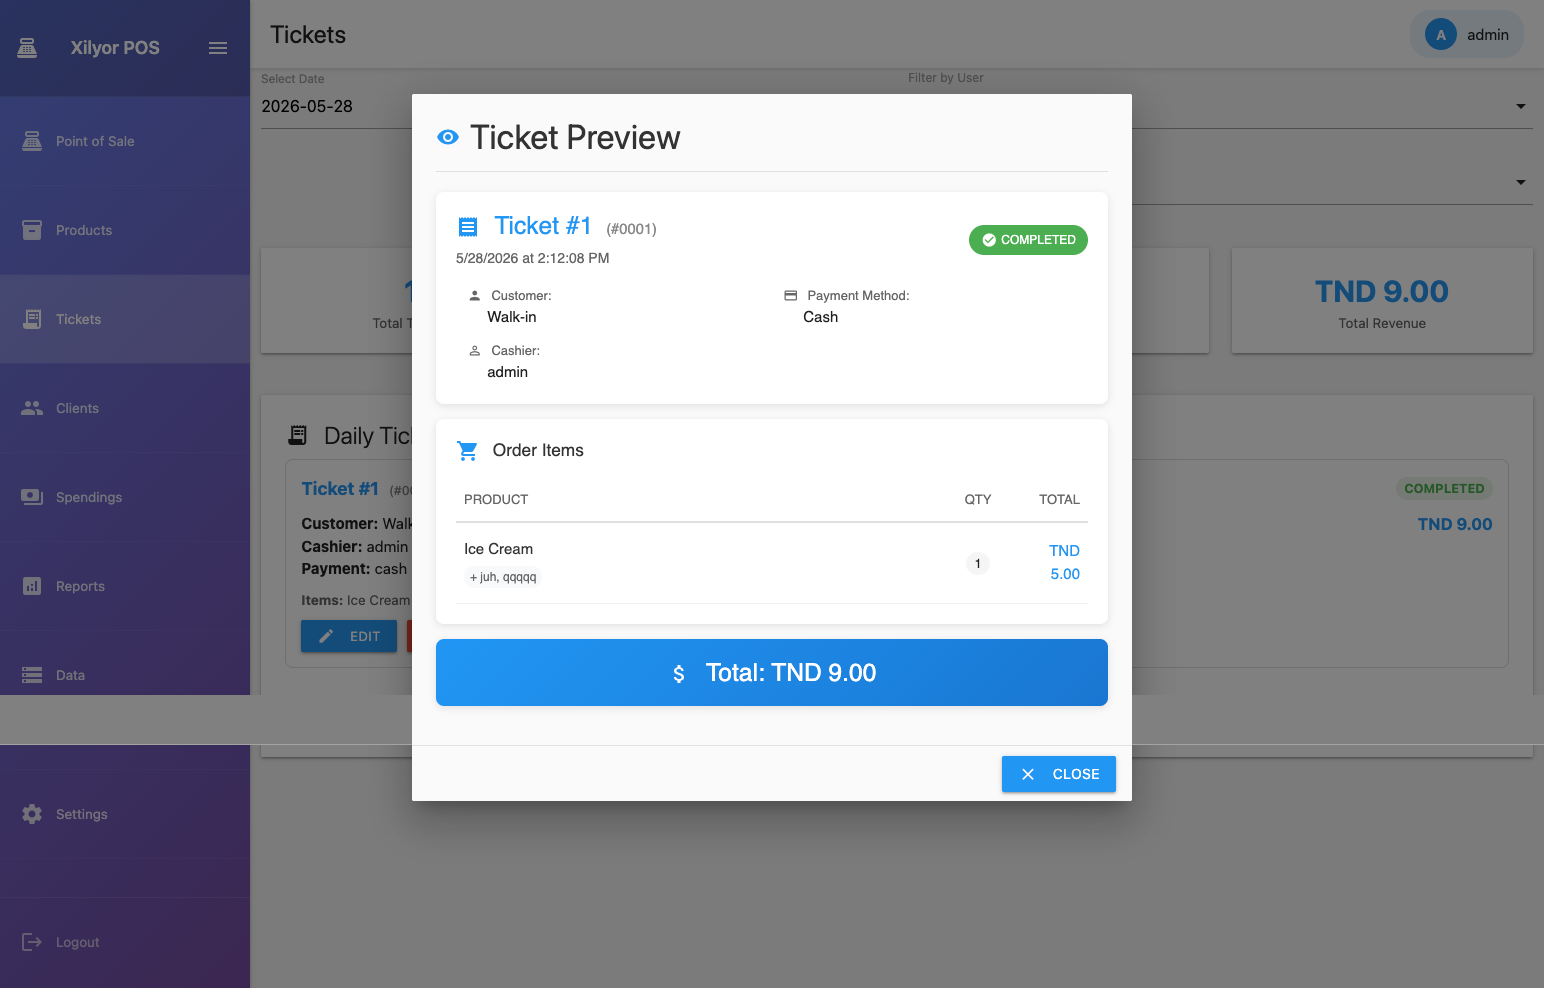
Preview

View full order details before printing — item list, totals, client, staff.

Ticket preview
Ticket preview before printing
ℹ️
Printer required: Ticket printing uses the receipt printer configured under Settings → Printers. If no printer is set up, the button will warn you.
Business — 05

Clients Premium

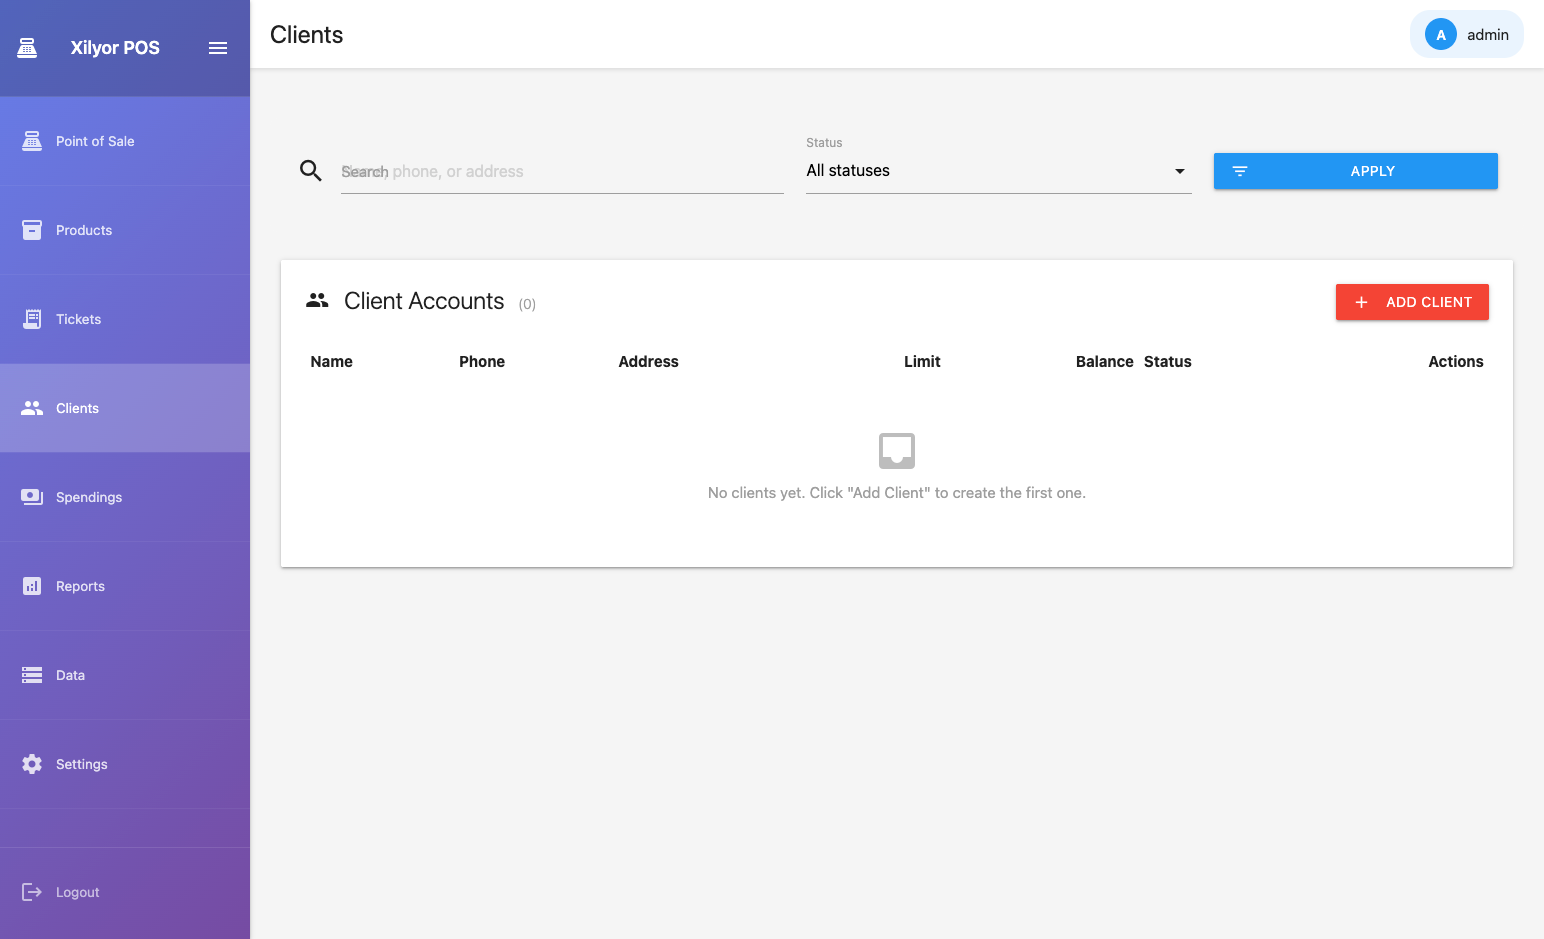
Build a customer database, assign clients to orders, enable deferred "Pay Later" billing, and track credit balances.

Clients list
Client directory

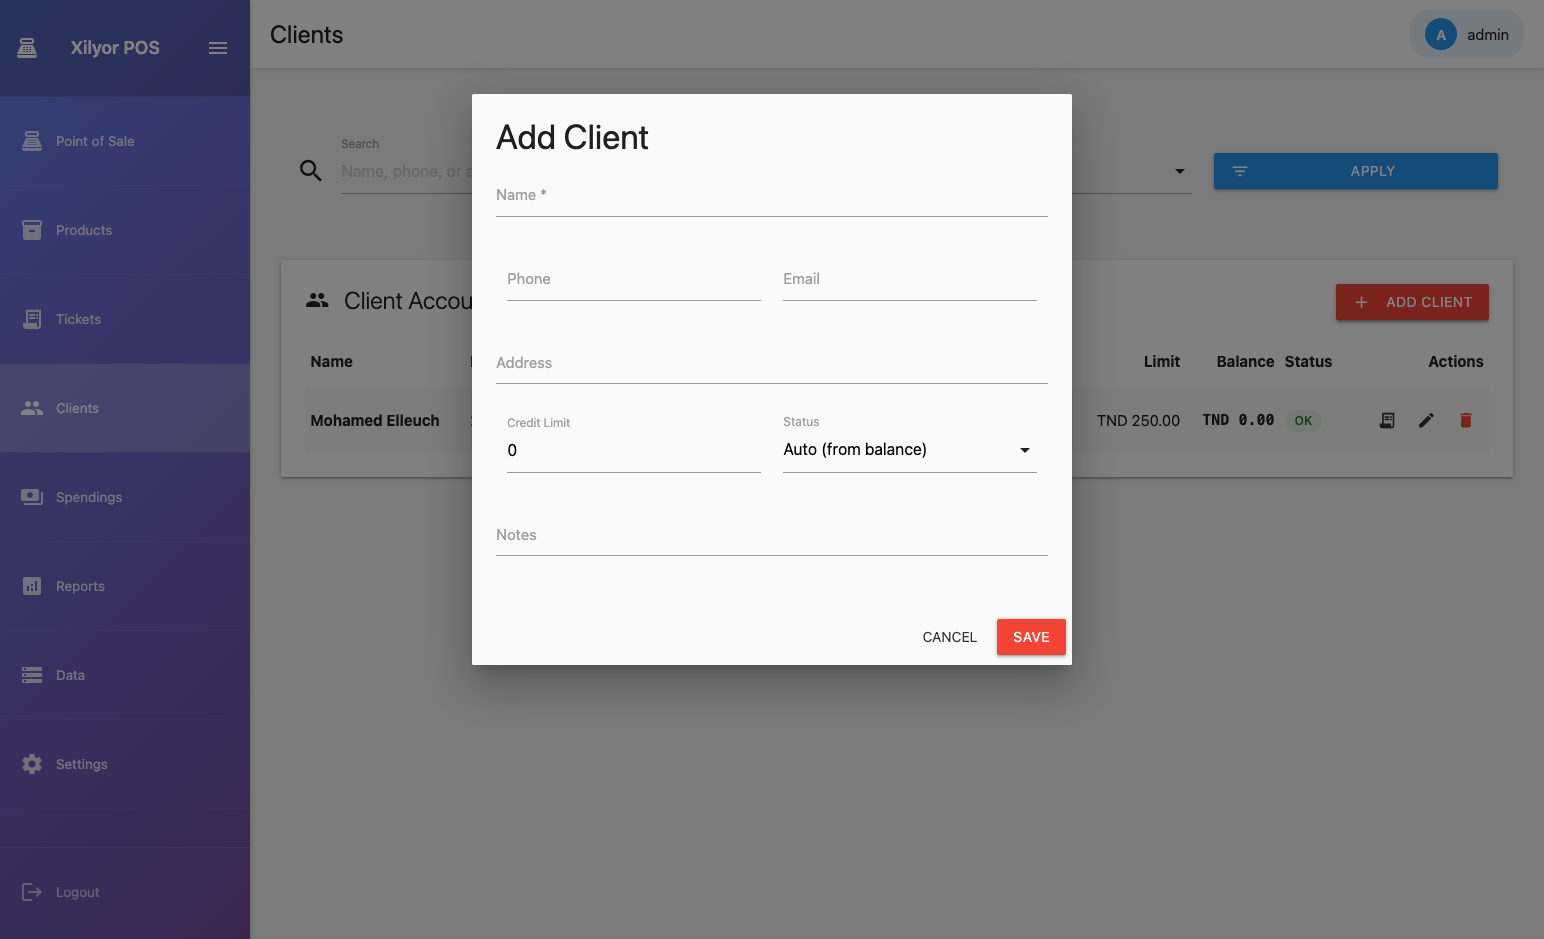
Adding a client

  • 1
    Click "Add Client"Opens the client form.
  • 2
    Enter nameRequired. Phone and email are optional but useful for search.
  • 3
    Set credit limitIf the client will use Pay Later, define how much credit they can hold.
  • 4
    SaveThe client is immediately available at checkout.
Add client form
New client form

Client statuses

StatusMeaningPay Later available?
NormalWithin credit limit, no issuesYes
AlertApproaching credit limitYes — cashier sees a warning
RestrictedOver limit or flagged manuallyNo — button is disabled
💡
When a restricted client is assigned to an order at the POS, a visual alert is shown to the cashier before payment proceeds.
Business — 06

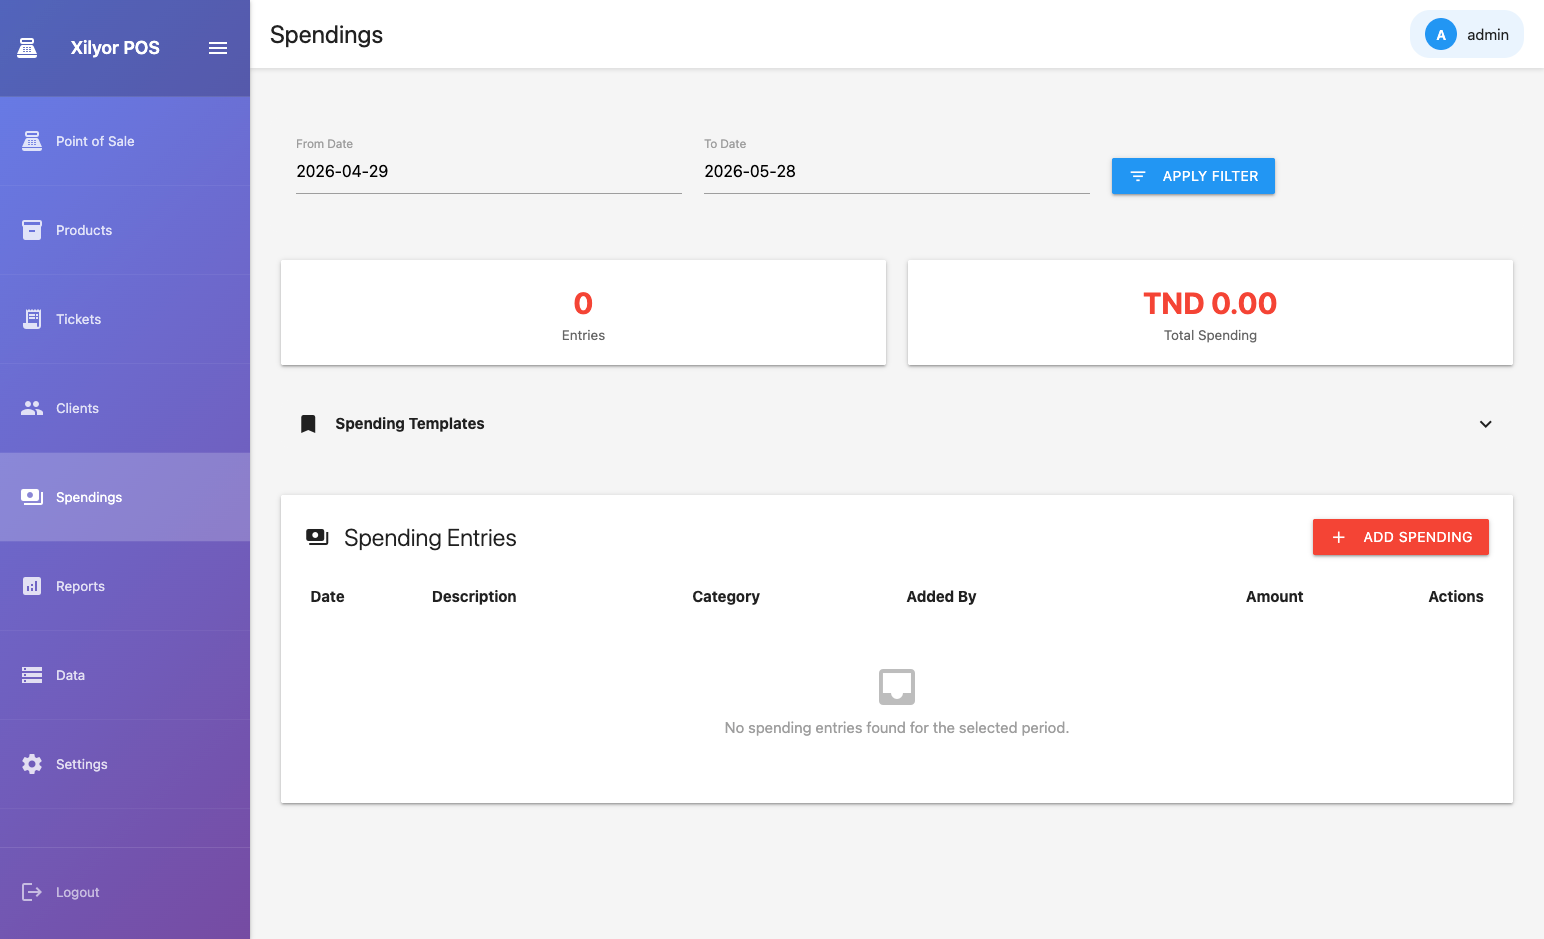
Spendings

Log operational expenses — supplies, repairs, salaries — and feed them into the net profit calculation inside Reports.

Spendings list
Expense log

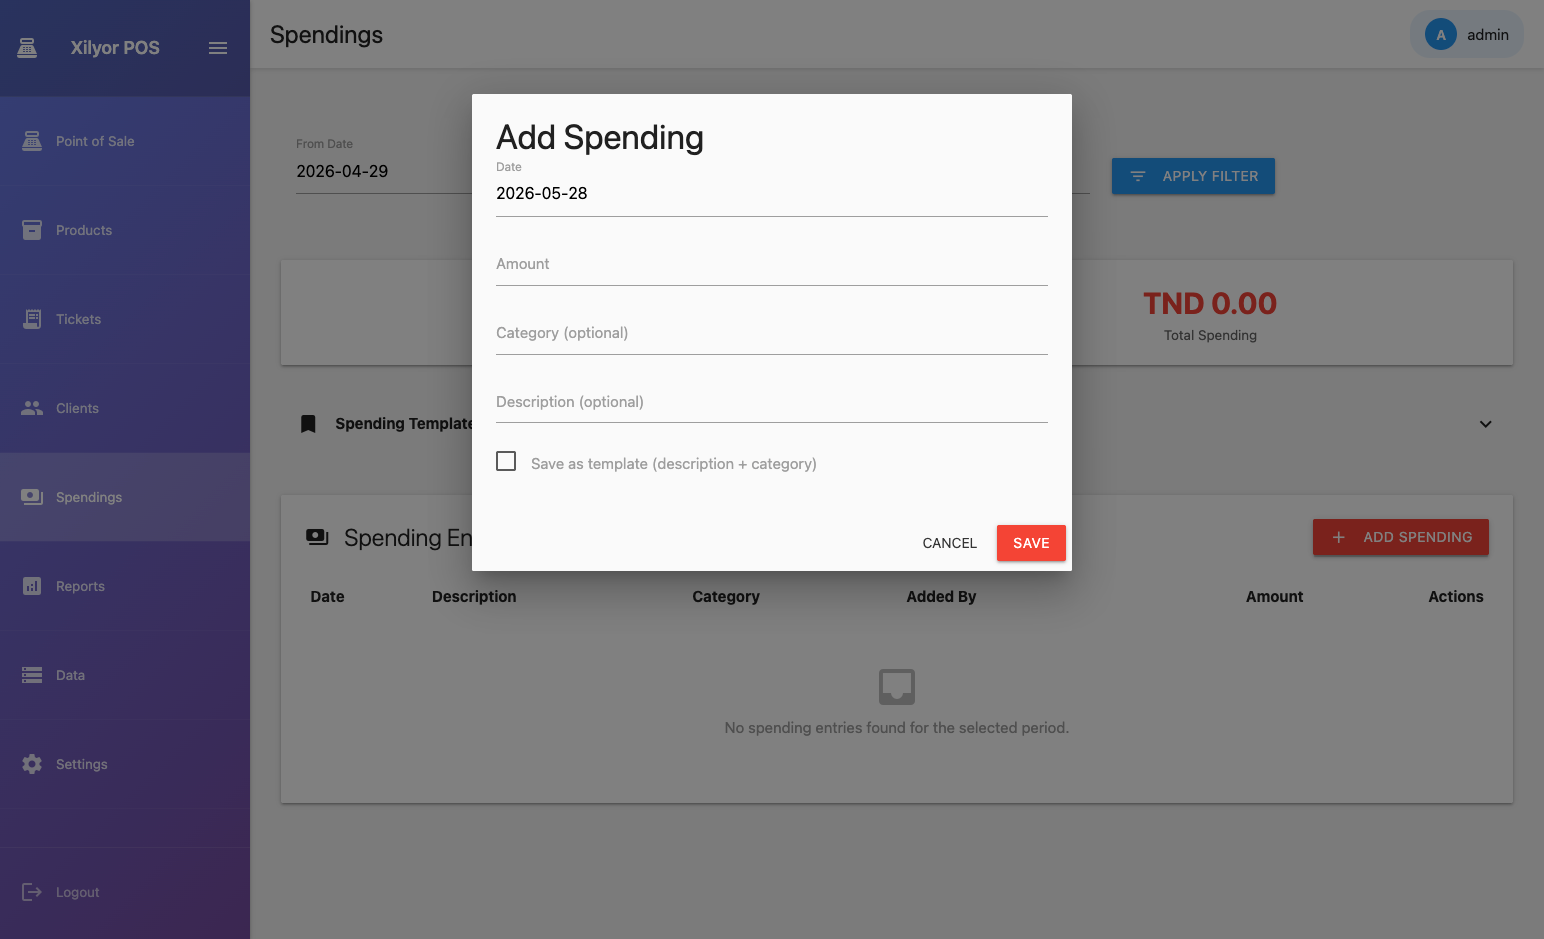
Recording an expense

  • 1
    Click "Add Spending"
  • 2
    Select categorySupplies, Equipment, Staff, Maintenance, or Other.
  • 3
    Enter amountIn the venue's configured currency.
  • 4
    Add a noteBrief description — "Monthly gas bill", "Flour 10kg", etc.
  • 5
    SaveExpense is timestamped and included in Reports → Net Gain.
Add spending form
Add expense form
📊
Spendings feed directly into the Net Gain metric in Reports. Revenue − Spending = Net Gain for any selected date range.
Business — 07

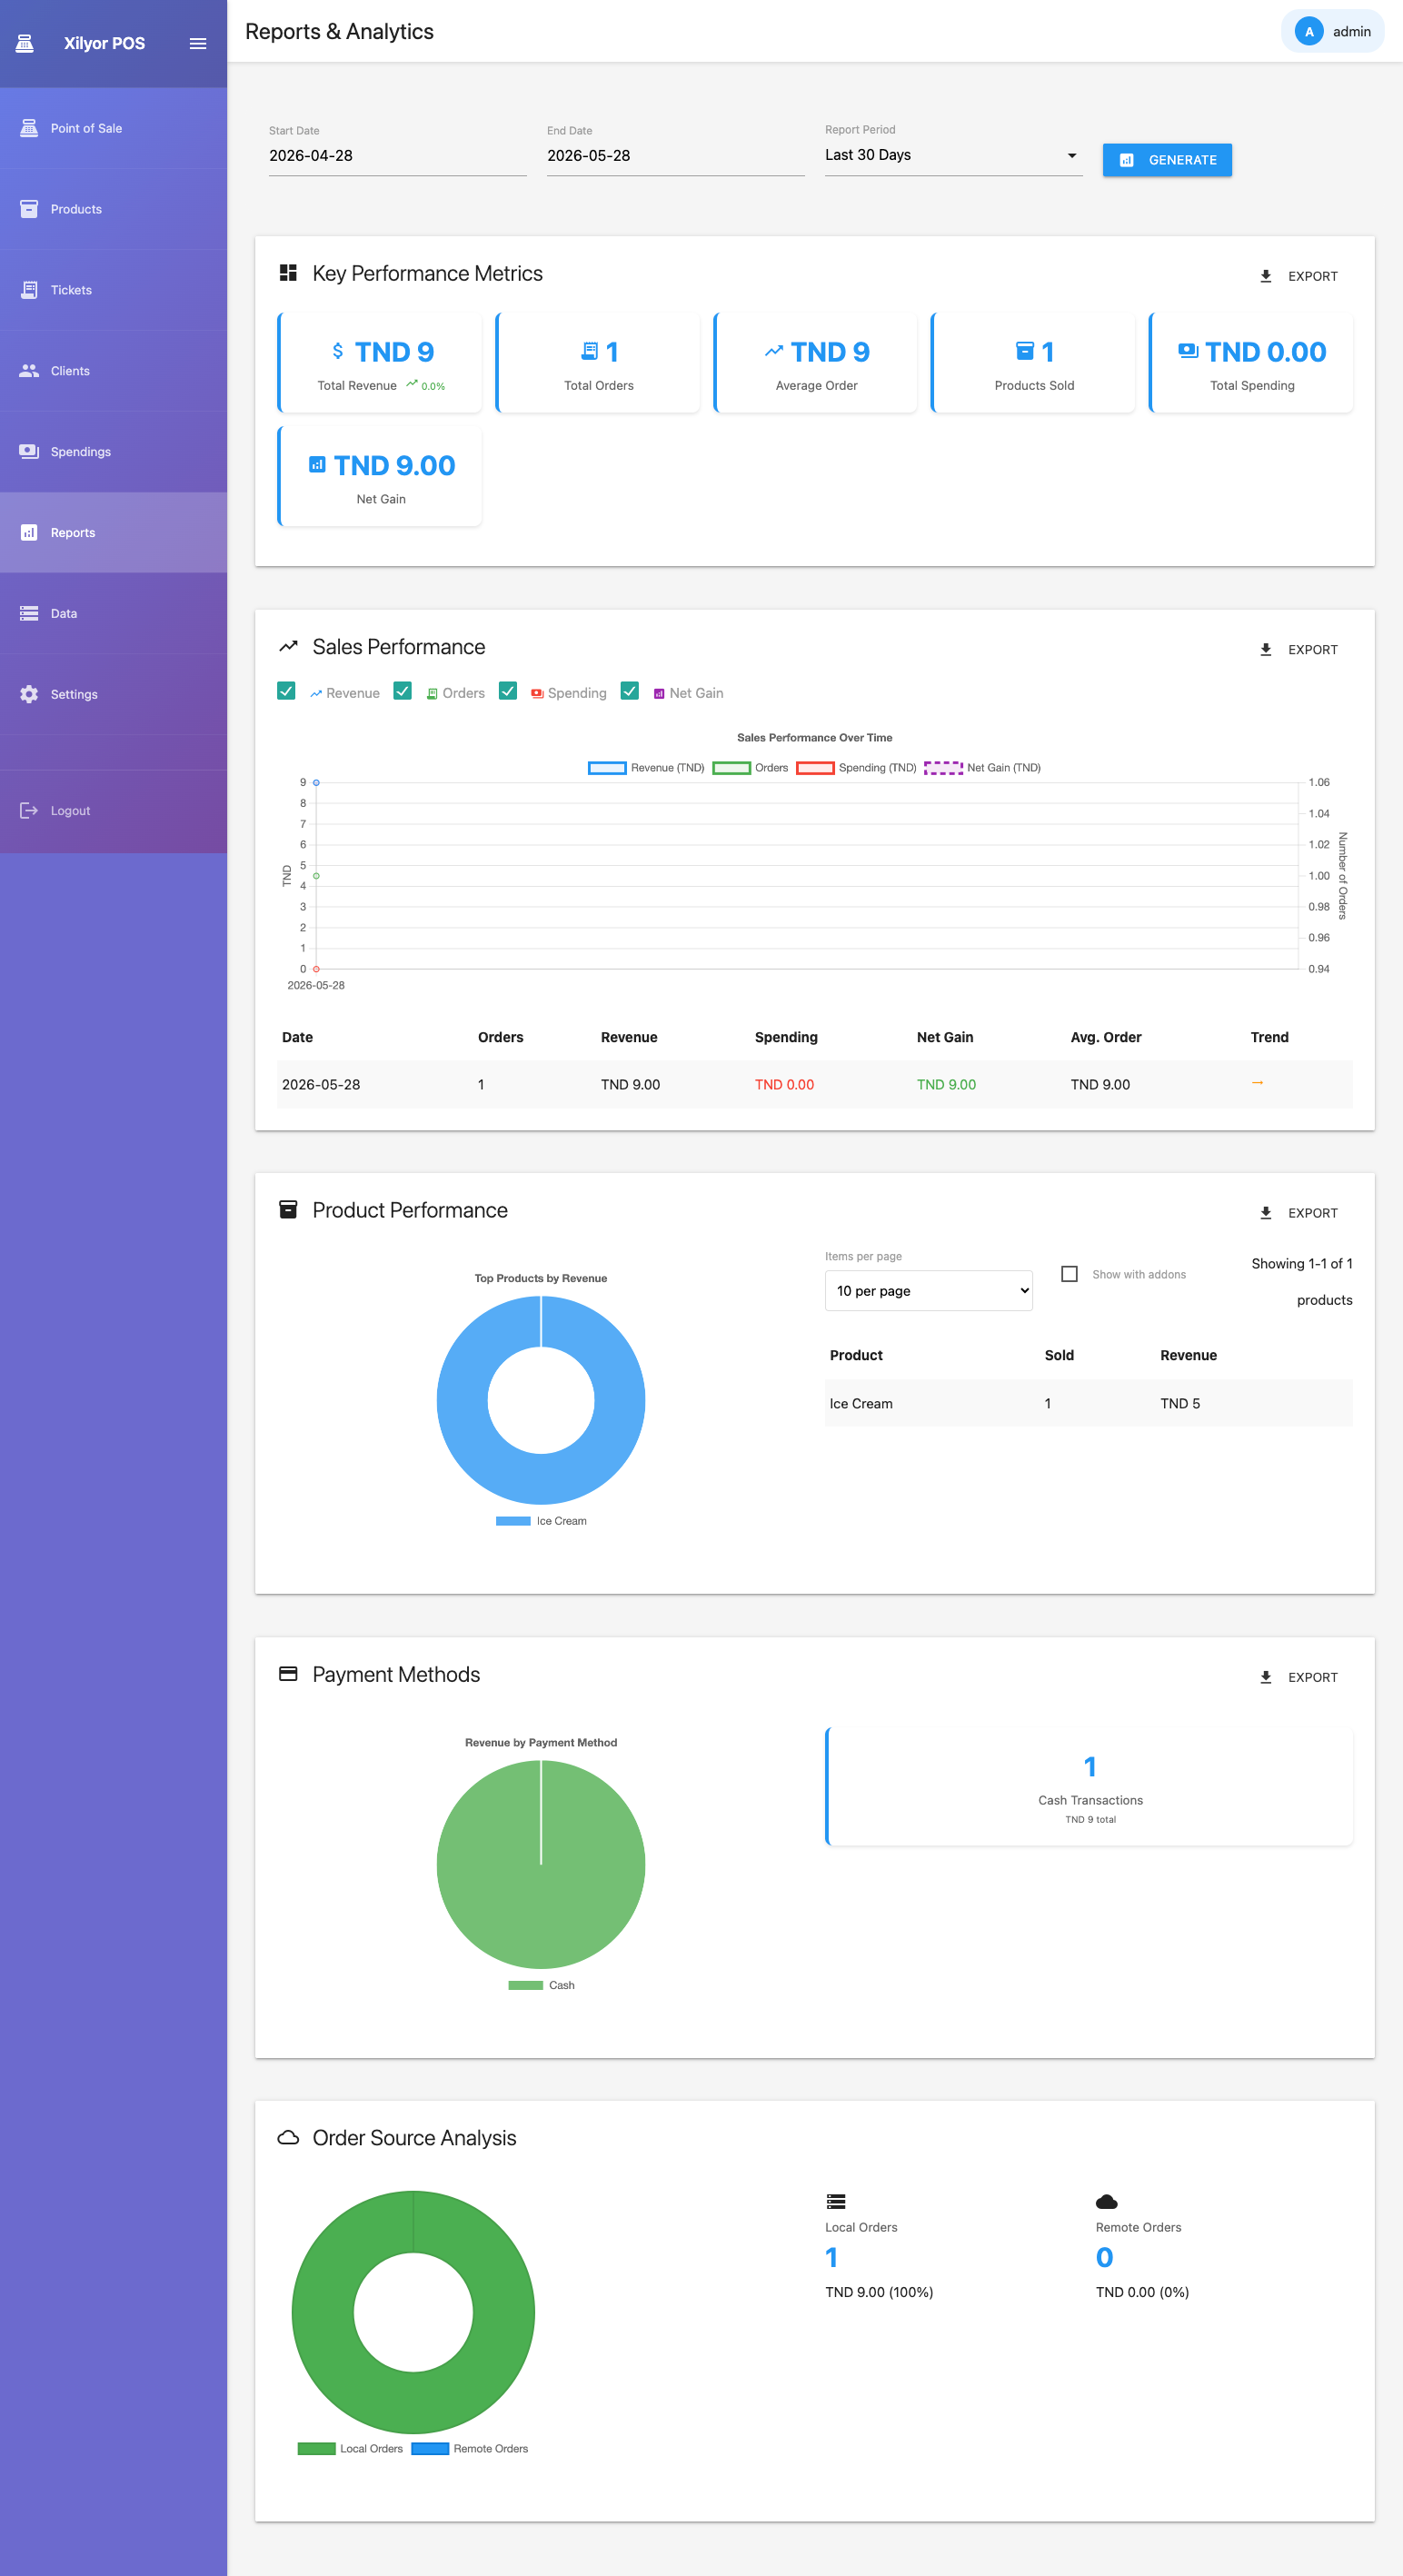
Reports & Analytics

Understand your business with revenue trends, product rankings, payment method distribution, and net gain over any date range.

Reports dashboard
Analytics dashboard

Available report types

📈

Sales Report

Revenue and order count over time — day, week, or month granularity.

🏆

Top Products

Ranking of best-selling items by quantity and revenue contribution.

💳

Payment Methods

Revenue split across Cash, Card, and Pay Later channels.

📦

Order Source

Breakdown by where orders originated — dine-in, takeaway, etc.

💰

Net Gain

Revenue minus logged spendings for the selected period.

📤

Export

Download any report as a JSON data file for external analysis.


Date range selection

Presets: Week, Month, Year. Or pick a custom start and end date using the date pickers, then click Generate.

System — 08

Settings

Configure your venue, manage user accounts, set up printers and print channels, and control the license.

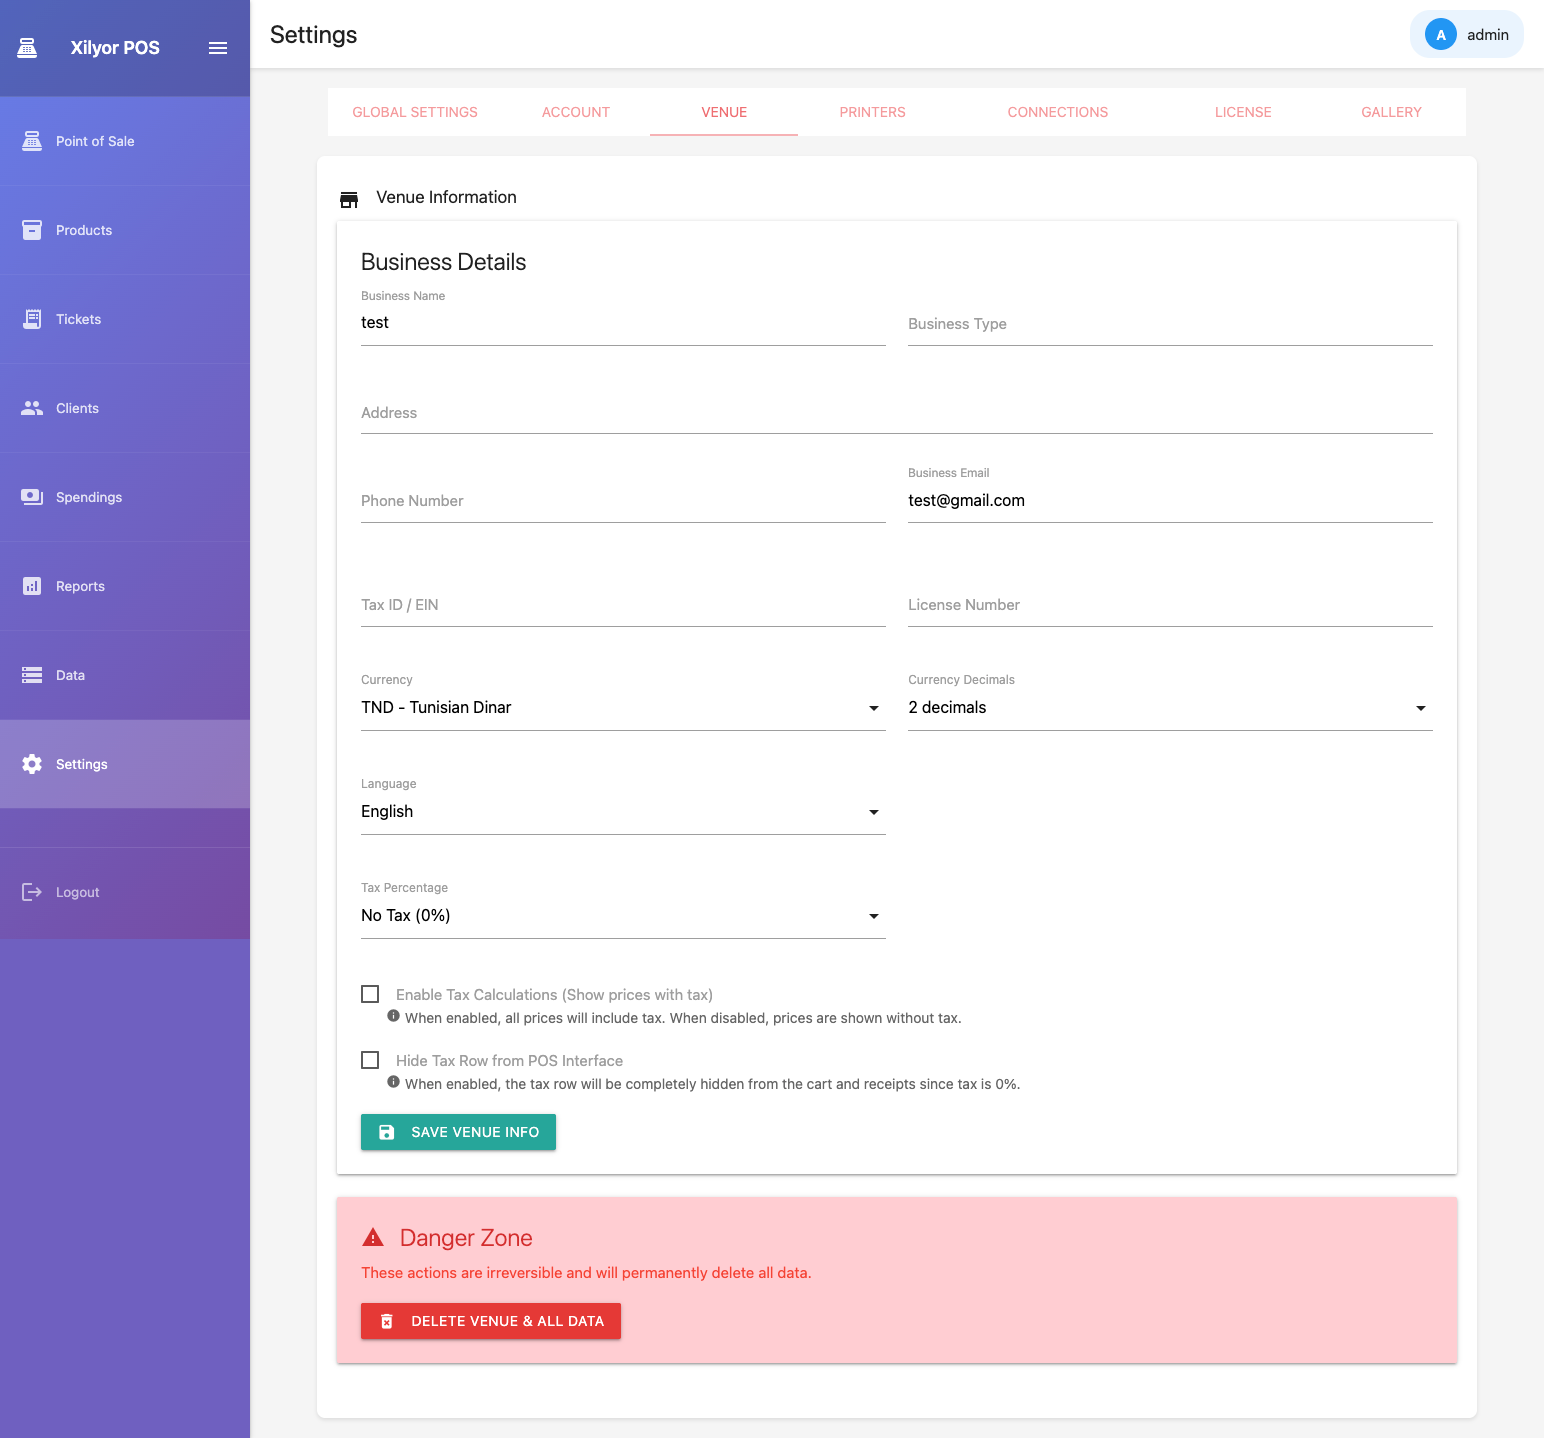
Venue

Business name, address, contact info, language, and currency — shown on printed receipts.

Venue settings
Venue / business information

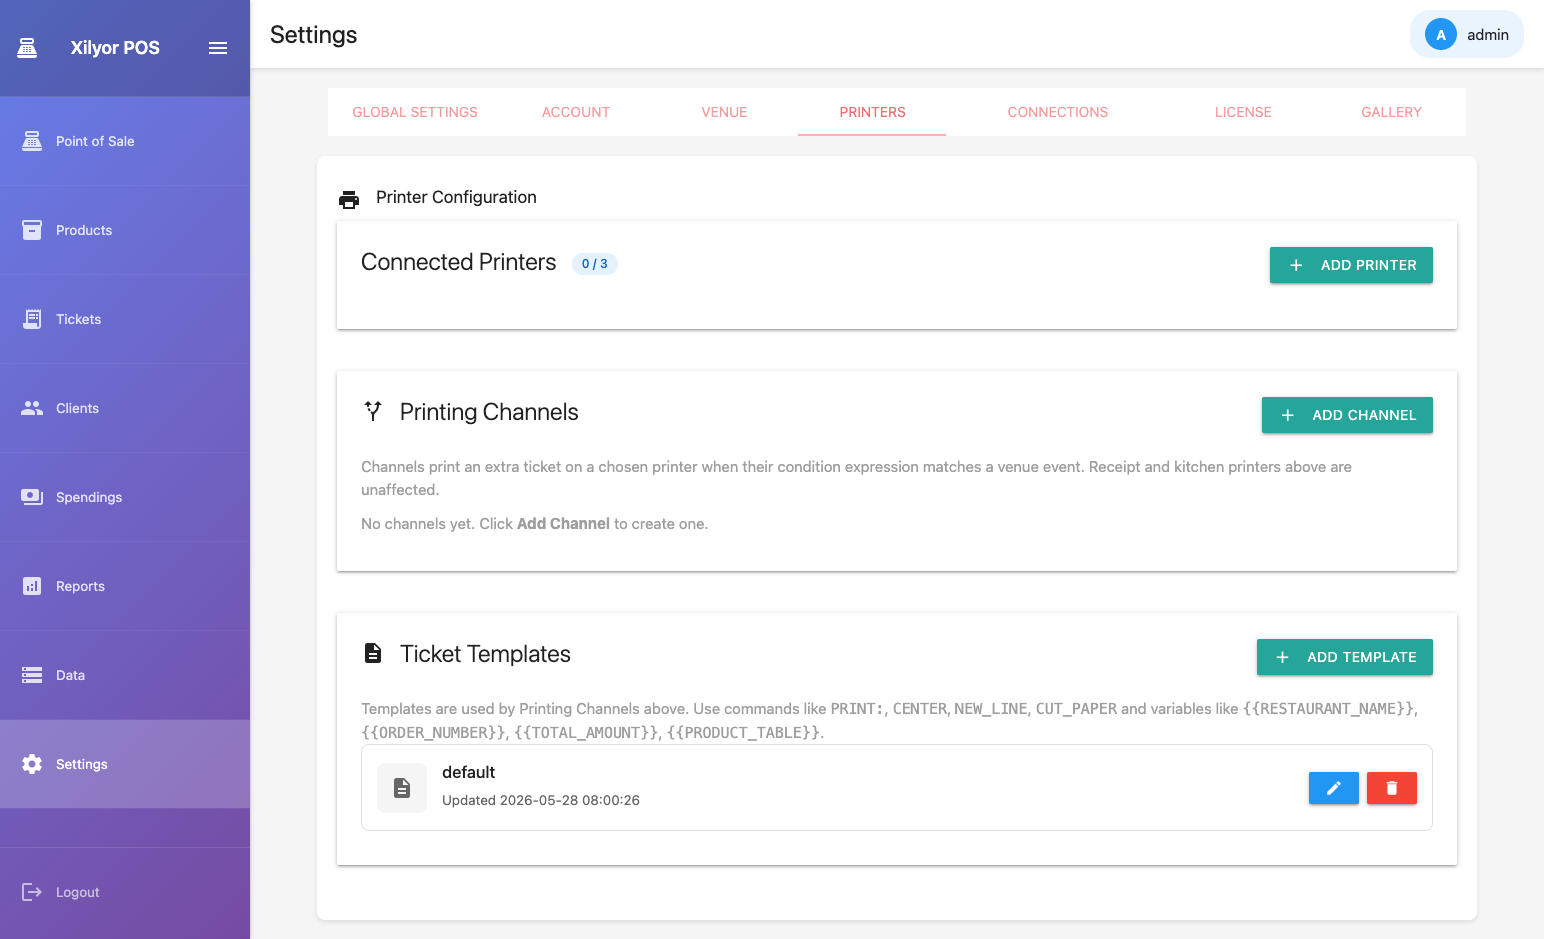
Printers & Channels

Add thermal printers, then define printing channels that route tickets automatically based on payment conditions.

Printer configuration
Printer management and channel setup
SettingDescription
Printer NameLabel used in logs and channel selection
ConnectionNetwork (IP:port) or USB device path
Printing ChannelTrigger conditions (e.g. "print on any payment") and the template to use
Test PrintSends a test page to verify the printer is reachable
Connection CheckPings the printer IP to confirm network reachability
💡
A printer must have at least one Printing Channel to print anything. Channels define when a ticket fires (e.g. on every payment) and which template to use.

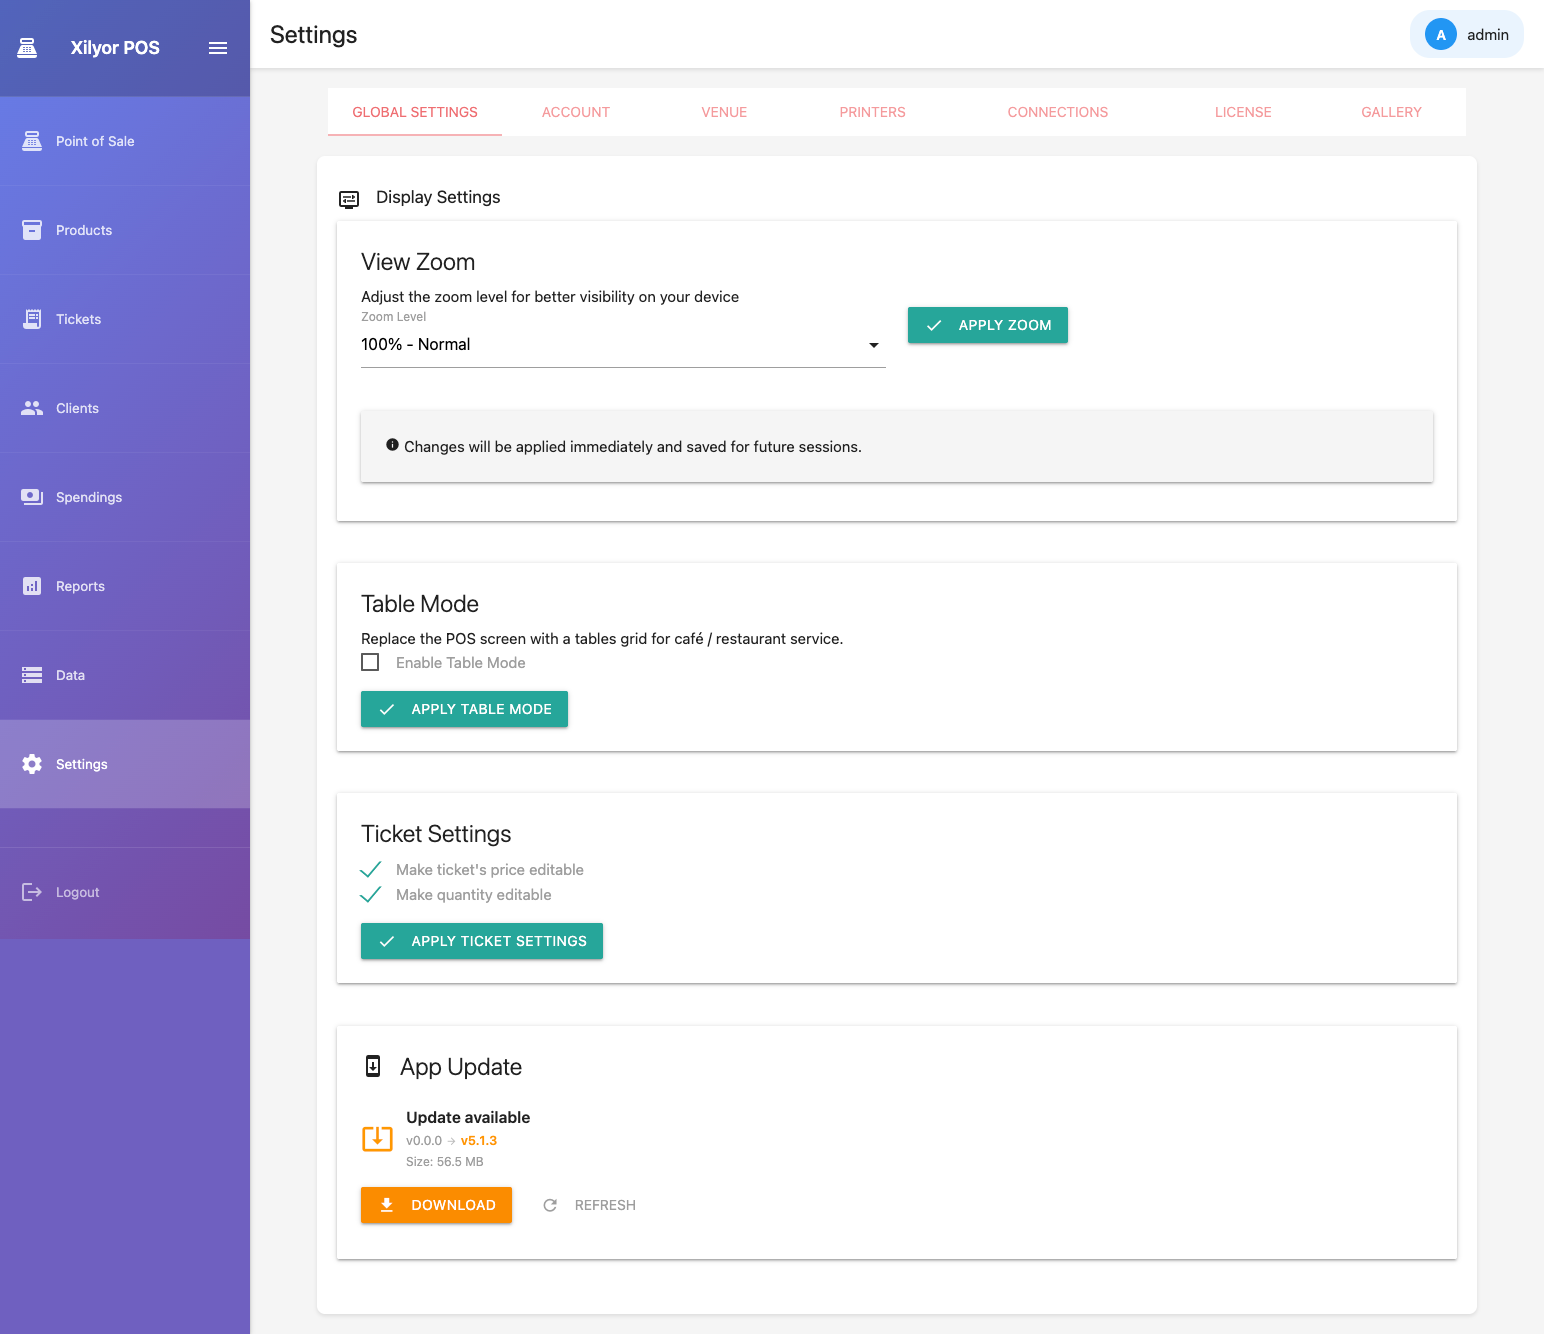
Global Display

Display settings
UI and display preferences
  • UI Zoom — scale the interface for large or small screens
  • Table Mode — enable numbered tables for restaurant floor management
  • Tax Display — show or hide tax breakdown on receipts and summaries
  • Ticket Editability — allow cashiers to change prices or quantities at checkout

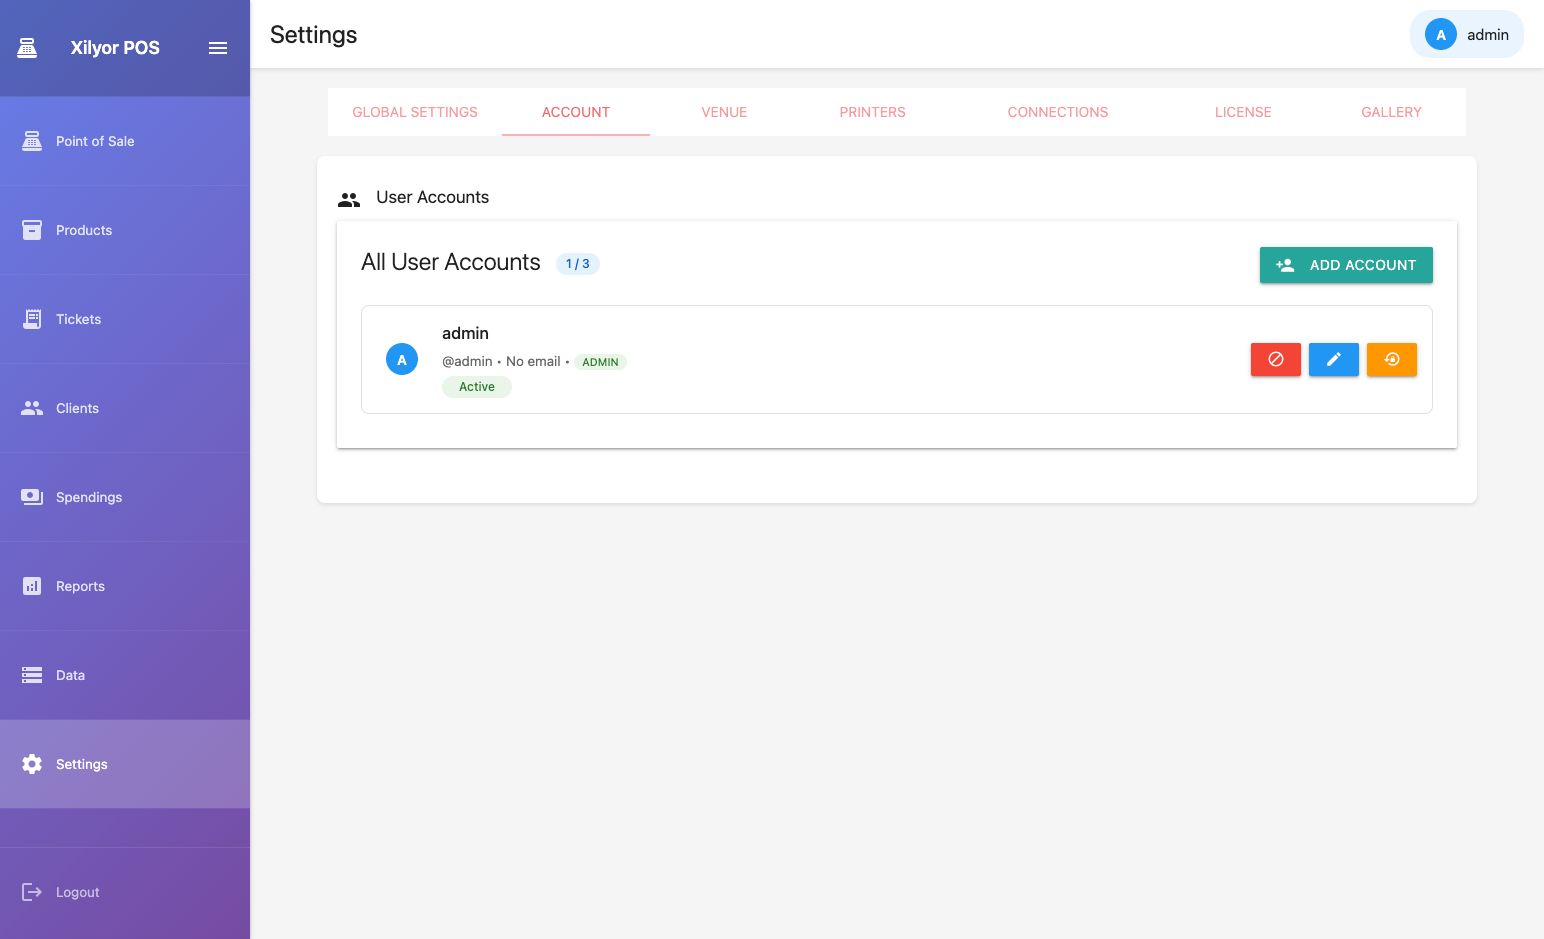
Account

Account settings
User account management

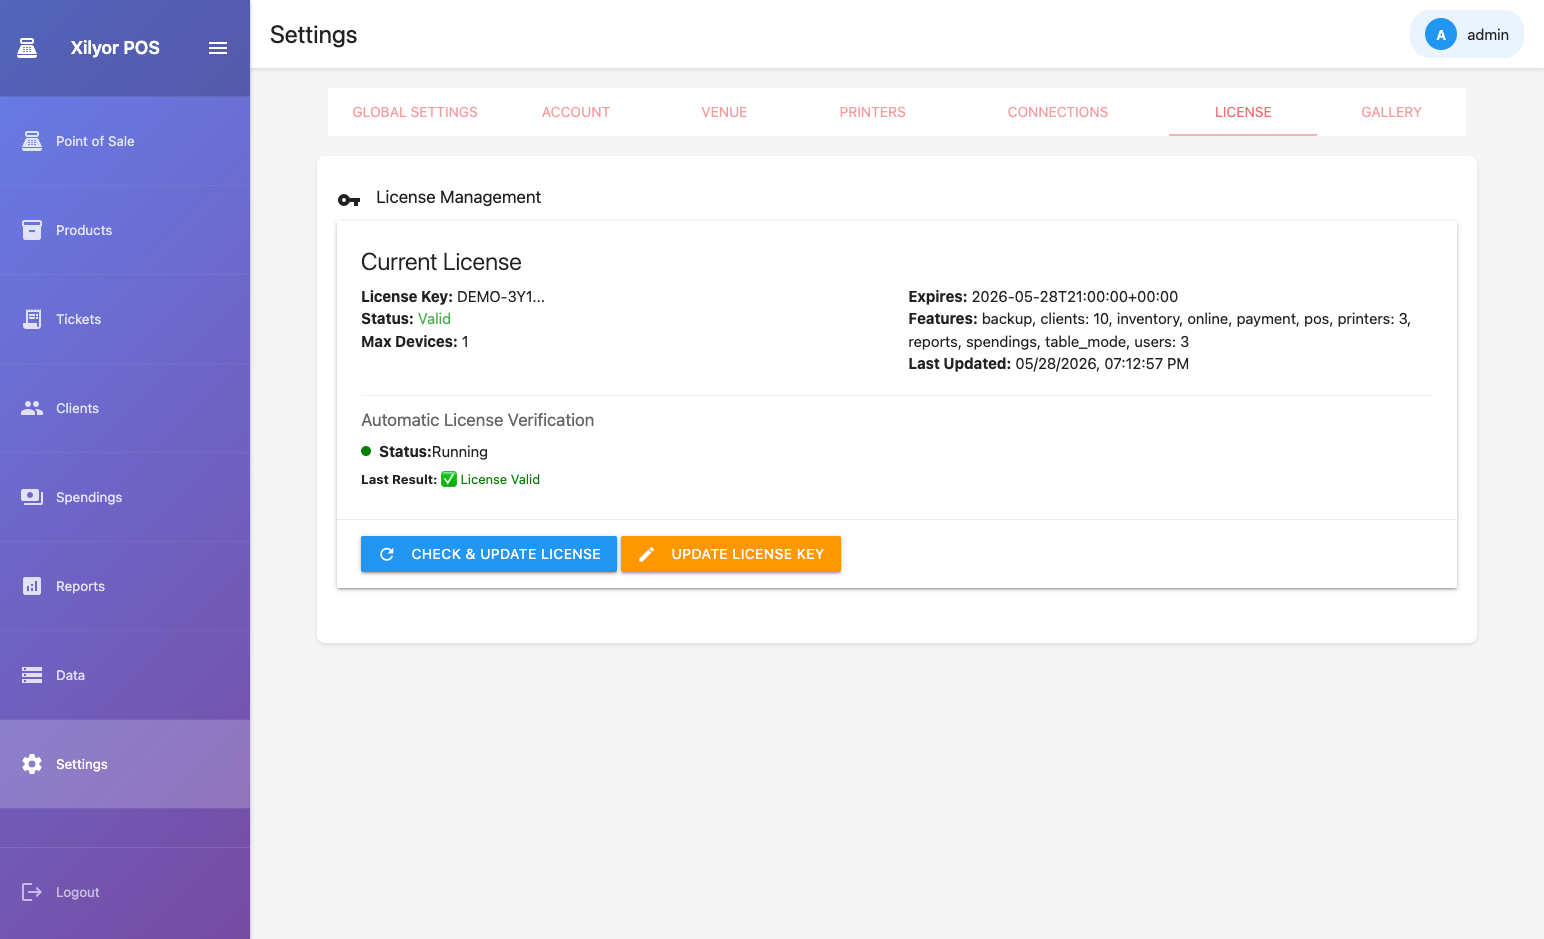
License

License settings
License key and feature tiers

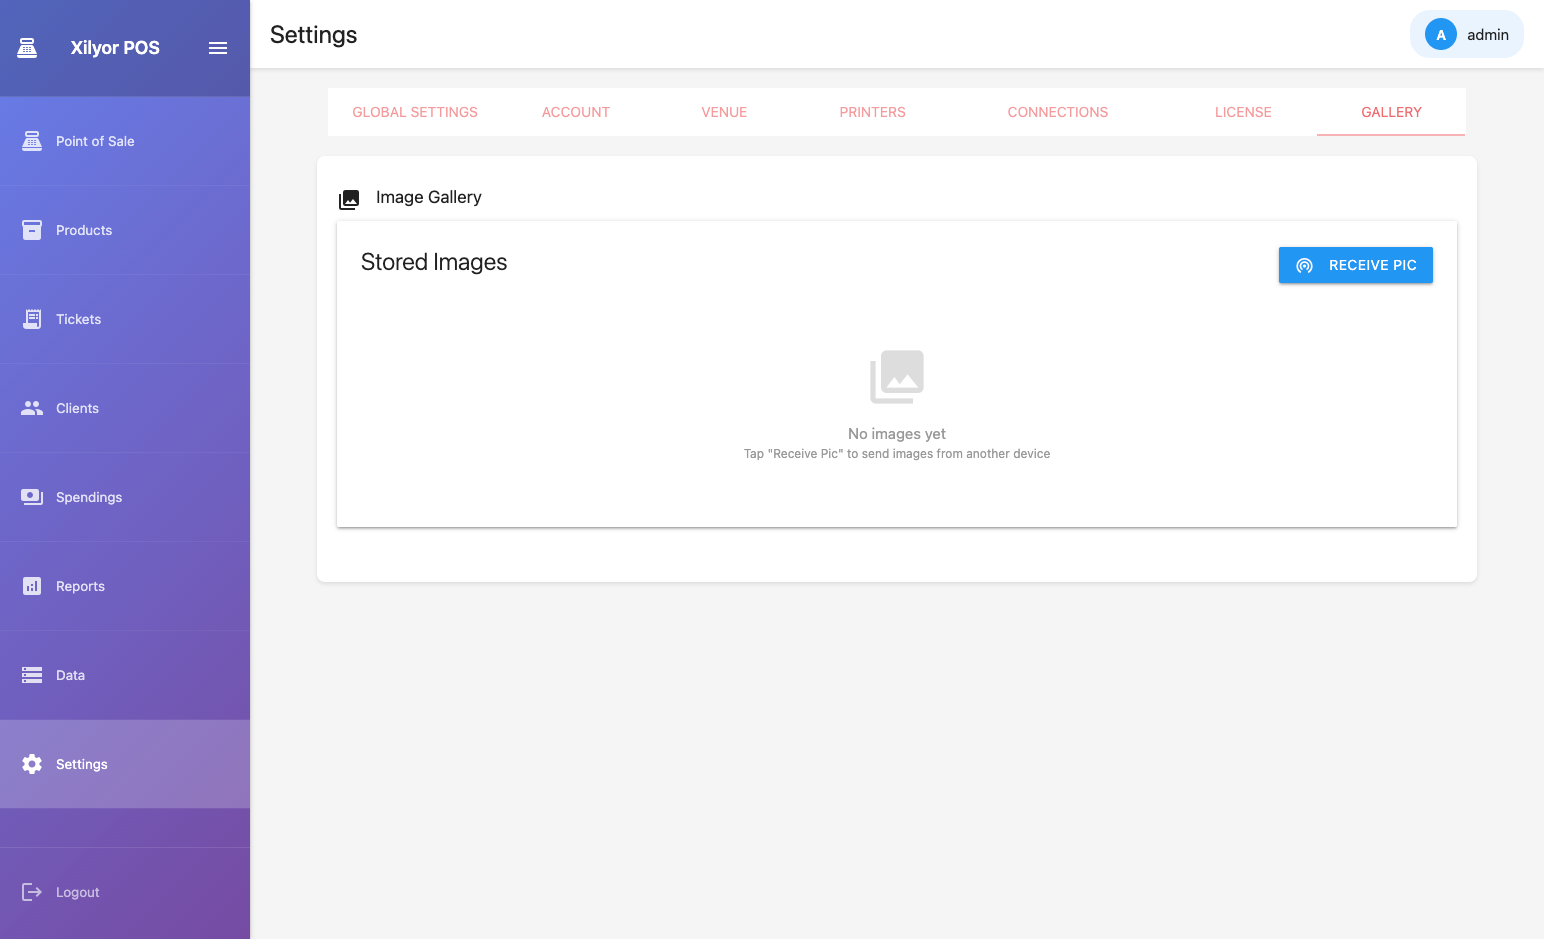
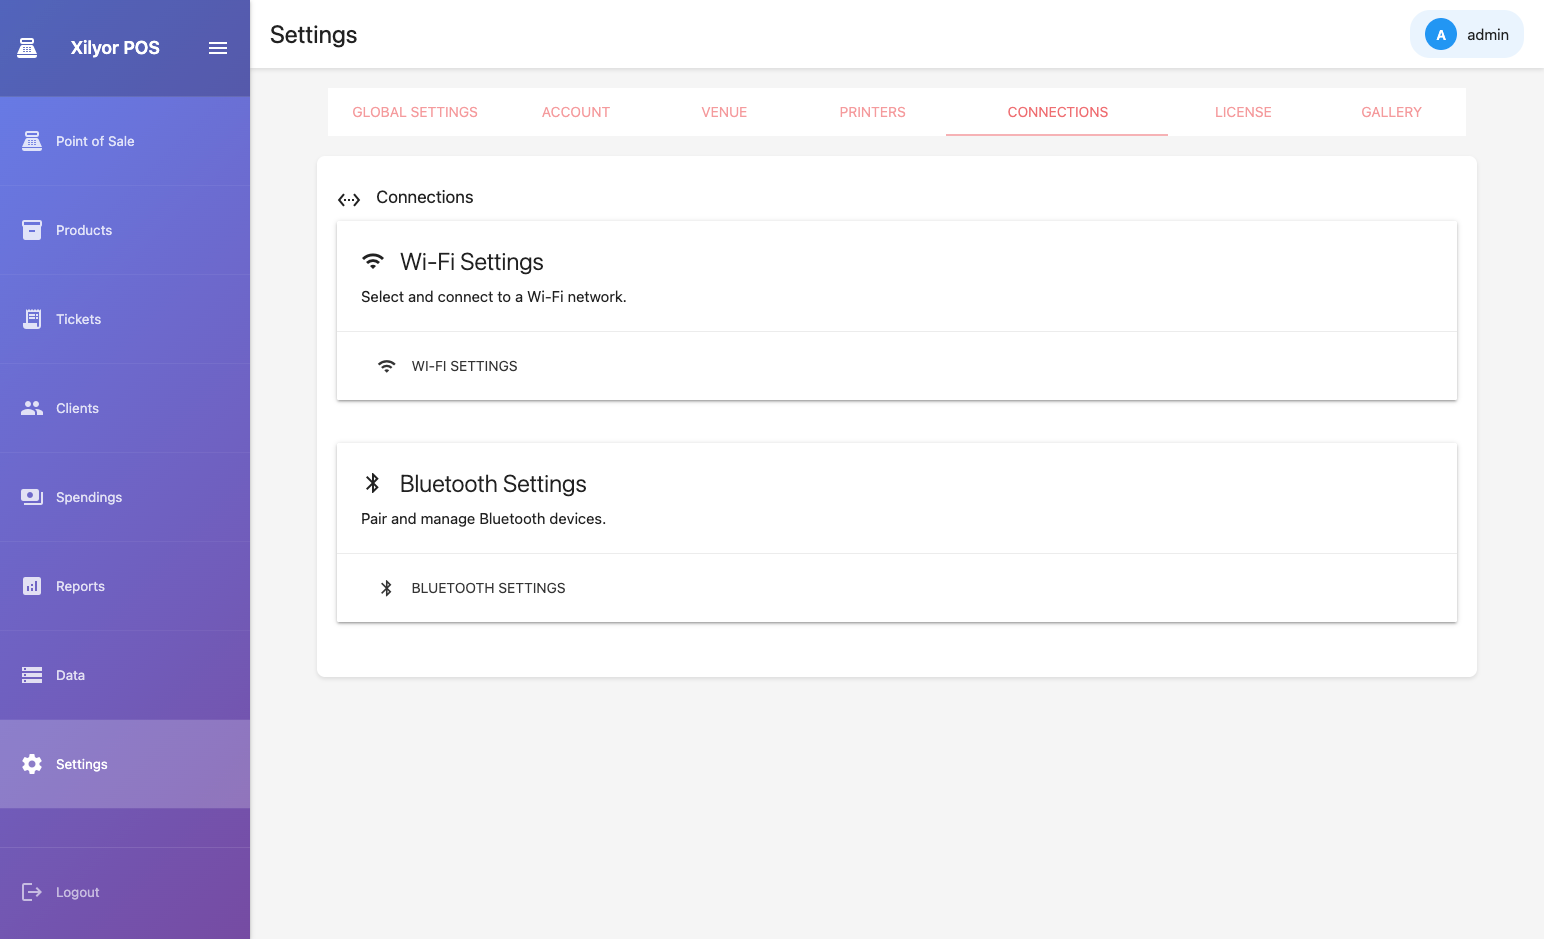
Gallery & Connections

Image gallery
Product image gallery
Network connections
WiFi / network settings
System — 09

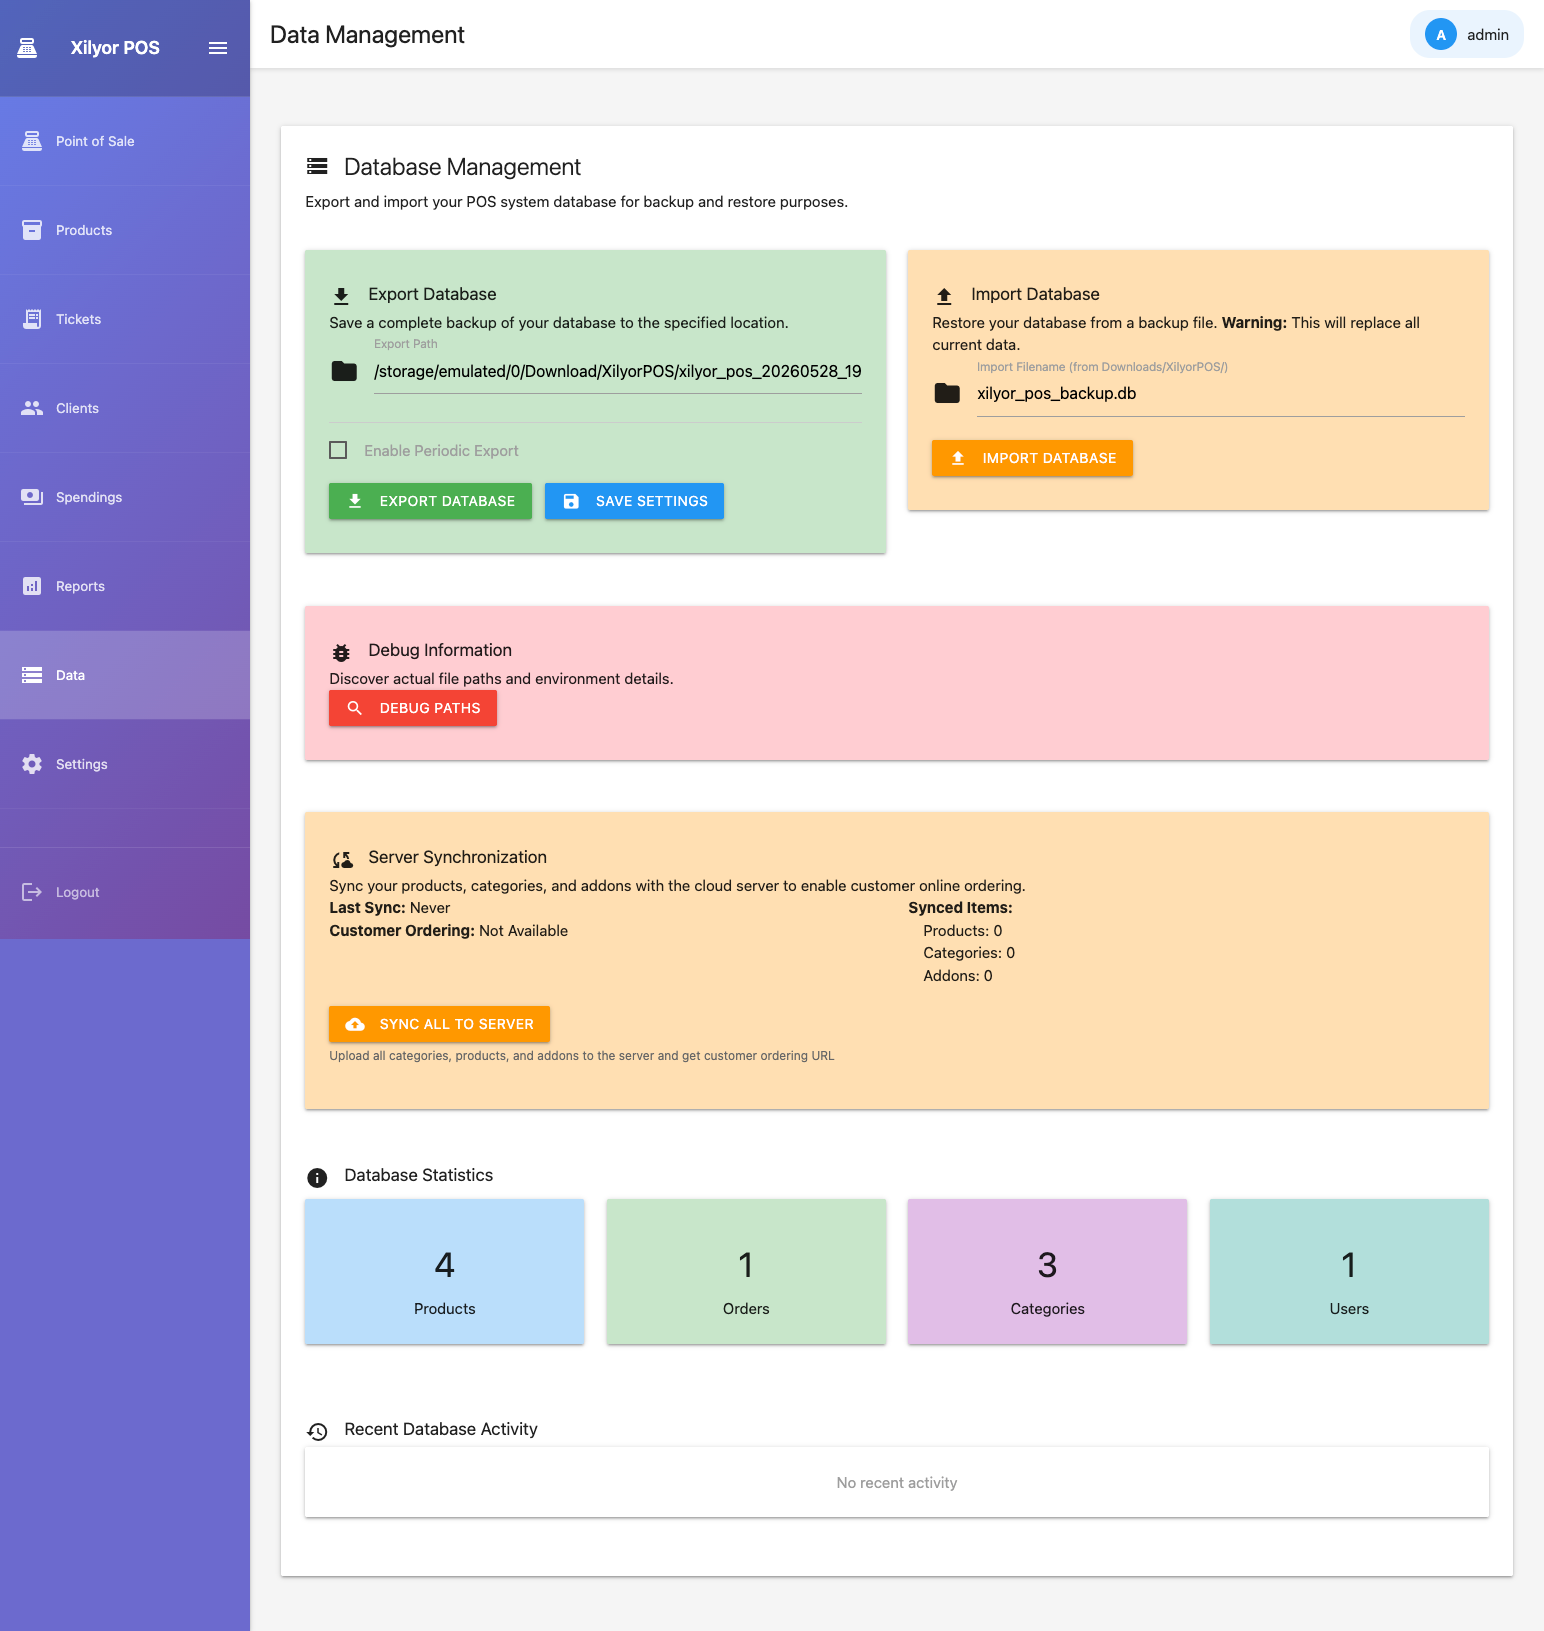
Data Management

Export a full database backup, import a previous backup to restore, and verify data integrity.

Data management
Backup, restore, and data tools

Operations

Export

Download a complete snapshot of all data — products, orders, clients, settings — as a portable file.

Import

Restore from a previous export. This replaces all current data — create an export first as a safety net.

⚠️
Destructive operation: Importing a backup permanently replaces all existing products, orders, clients, and settings. Always export first so you can roll back if needed.
Reference — 11

Template
Preview

Write or paste a print template, fill in the variable values, and see a live receipt preview rendered exactly as it would print on a thermal printer.

Load preset:
Template
Variables
Venue
Order
Products
Name | Qty | Price  ·  addons: + Name | | Price
← Click "Render Preview" to generate
Reference — 10

Printer Command
Reference

Build custom print templates using these commands. Each template is a plain-text file processed top-to-bottom by the print engine.

Text & Layout

CommandExampleDescription
PRINT:<text>PRINT:Hello WorldPrint a line of text followed by a newline
NEW_LINENEW_LINEFeed one blank line
CENTERCENTERAlign subsequent text to center
LEFTLEFTAlign subsequent text to the left (default)
RIGHTRIGHTAlign subsequent text to the right

Text Style

CommandExampleDescription
SET_BOLDSET_BOLDEnable bold text
UNSET_BOLDUNSET_BOLDDisable bold text
SET_UNDERLINESET_UNDERLINEEnable underline (double weight)
UNSET_UNDERLINEUNSET_UNDERLINEDisable underline
SET_INVERTEDSET_INVERTEDWhite text on black background
UNSET_INVERTEDUNSET_INVERTEDRestore normal text colors
SET_FONT_ASET_FONT_ASwitch to Font A (normal, wider)
SET_FONT_BSET_FONT_BSwitch to Font B (smaller, condensed)
WIDTH:<n>WIDTH:2Set character width multiplier (1–8)
HEIGHT:<n>HEIGHT:2Set character height multiplier (1–8)
💡
WIDTH:2 + HEIGHT:2 gives double-size text. Always reset with WIDTH:1 / HEIGHT:1 after.

Tables

Multi-column aligned rows with optional per-cell styling.

TABLE:32,4,12
Product Name,Qty,Price
  + Addon, ,0.500
*TOTAL*, ,*TND 5.00*
TABLE_END
CommandDescription
TABLE:<w1>,<w2>,<w3>Start a table with column widths in characters. Columns are left-aligned except the last, which is right-aligned.
<col1>,<col2>,<col3>A table row — values separated by commas, one row per line.
TABLE_ENDClose the table.
ℹ️
Cell style markers — wrap cell content to apply styles: *bold*, ^font-b^, !inverted!

Barcodes & QR

CommandExampleDescription
QR_CODE:<text>QR_CODE:https://example.comPrint a QR code. Text can be any string or URL.
BAR_CODE:<TYPE>:<data>BAR_CODE:EAN:6192008320410Print a 1D barcode.
ℹ️
Supported barcode types: EAN / EAN13, EAN8, UPC-A, UPC-E, CODE39, CODE128, ITF, CODABAR, CODE93

Hardware

CommandDescription
CUT_PAPERCut the paper. Always place at the very end of a template.
OPEN_DRAWERSend a pulse to open the cash drawer.

Template Placeholders

These are replaced at render time with live order and venue data.

Venue

PlaceholderDescription
{{RESTAURANT_NAME}}Venue name
{{RESTAURANT_ADDRESS}}Venue address
{{RESTAURANT_PHONE}}Venue phone
{{RESTAURANT_EMAIL}}Venue email
{{TAX_ID}}Tax ID
{{LICENSE_NUMBER}}License number

Date & Time

PlaceholderDescription
{{DATE}}Current date — dd/mm/yyyy
{{TIME}}Current time — HH:MM
{{DATE_TIME}}Combined — dd/mm/yyyy HH:MM:SS

Order

PlaceholderDescription
{{ORDER_NUMBER}}Ticket / order number
{{ORDER_TIME}}Time the order was placed
{{ORDER_NOTE}}Free-text note attached to the order
{{ORDER_SOURCE}}Source (e.g. POS System)
{{CUSTOMER_NAME}}Customer name, defaults to Walk-in
{{STAFF_NAME}}Staff member who placed the order
{{PAYMENT_STATUS}}e.g. Paid / Unpaid
{{PAYMENT_METHOD}}e.g. Cash / Card
{{TOTAL_AMOUNT}}Total formatted as TND x.xx

Product Blocks

These expand into multi-line command sequences at render time.

PlaceholderDescription
{{PRODUCT_TABLE}}Full table: product name, qty, price per line + addon prices + total row
{{PRODUCT_LIST}}Compact single-line list: Item ×2, Other ×1
{{KITCHEN_PRODUCT_TABLE}}Items + addons only, no prices — for kitchen tickets

Minimal Template Example

CENTER
SET_BOLD
PRINT:{{RESTAURANT_NAME}}
UNSET_BOLD
PRINT:{{RESTAURANT_ADDRESS}}
NEW_LINE
LEFT
PRINT:Date : {{DATE}}  {{TIME}}
PRINT:Order #{{ORDER_NUMBER}}
NEW_LINE
PRINT:--------------------------------
NEW_LINE
{{PRODUCT_TABLE}}
NEW_LINE
PRINT:--------------------------------
NEW_LINE
CENTER
PRINT:Thank you!
NEW_LINE
NEW_LINE
NEW_LINE
NEW_LINE
CUT_PAPER
Xilyor POS Help
Hi! Ask me anything about Xilyor POS.